Intent Documentation
Communication of other apps with the Localion Navigator is achieved through Android Intents. In the following the usage of the existing intent builders of the LbIntentsLibrary are explained. To gain access to the library, please feel free to contact navigation@localion.de.
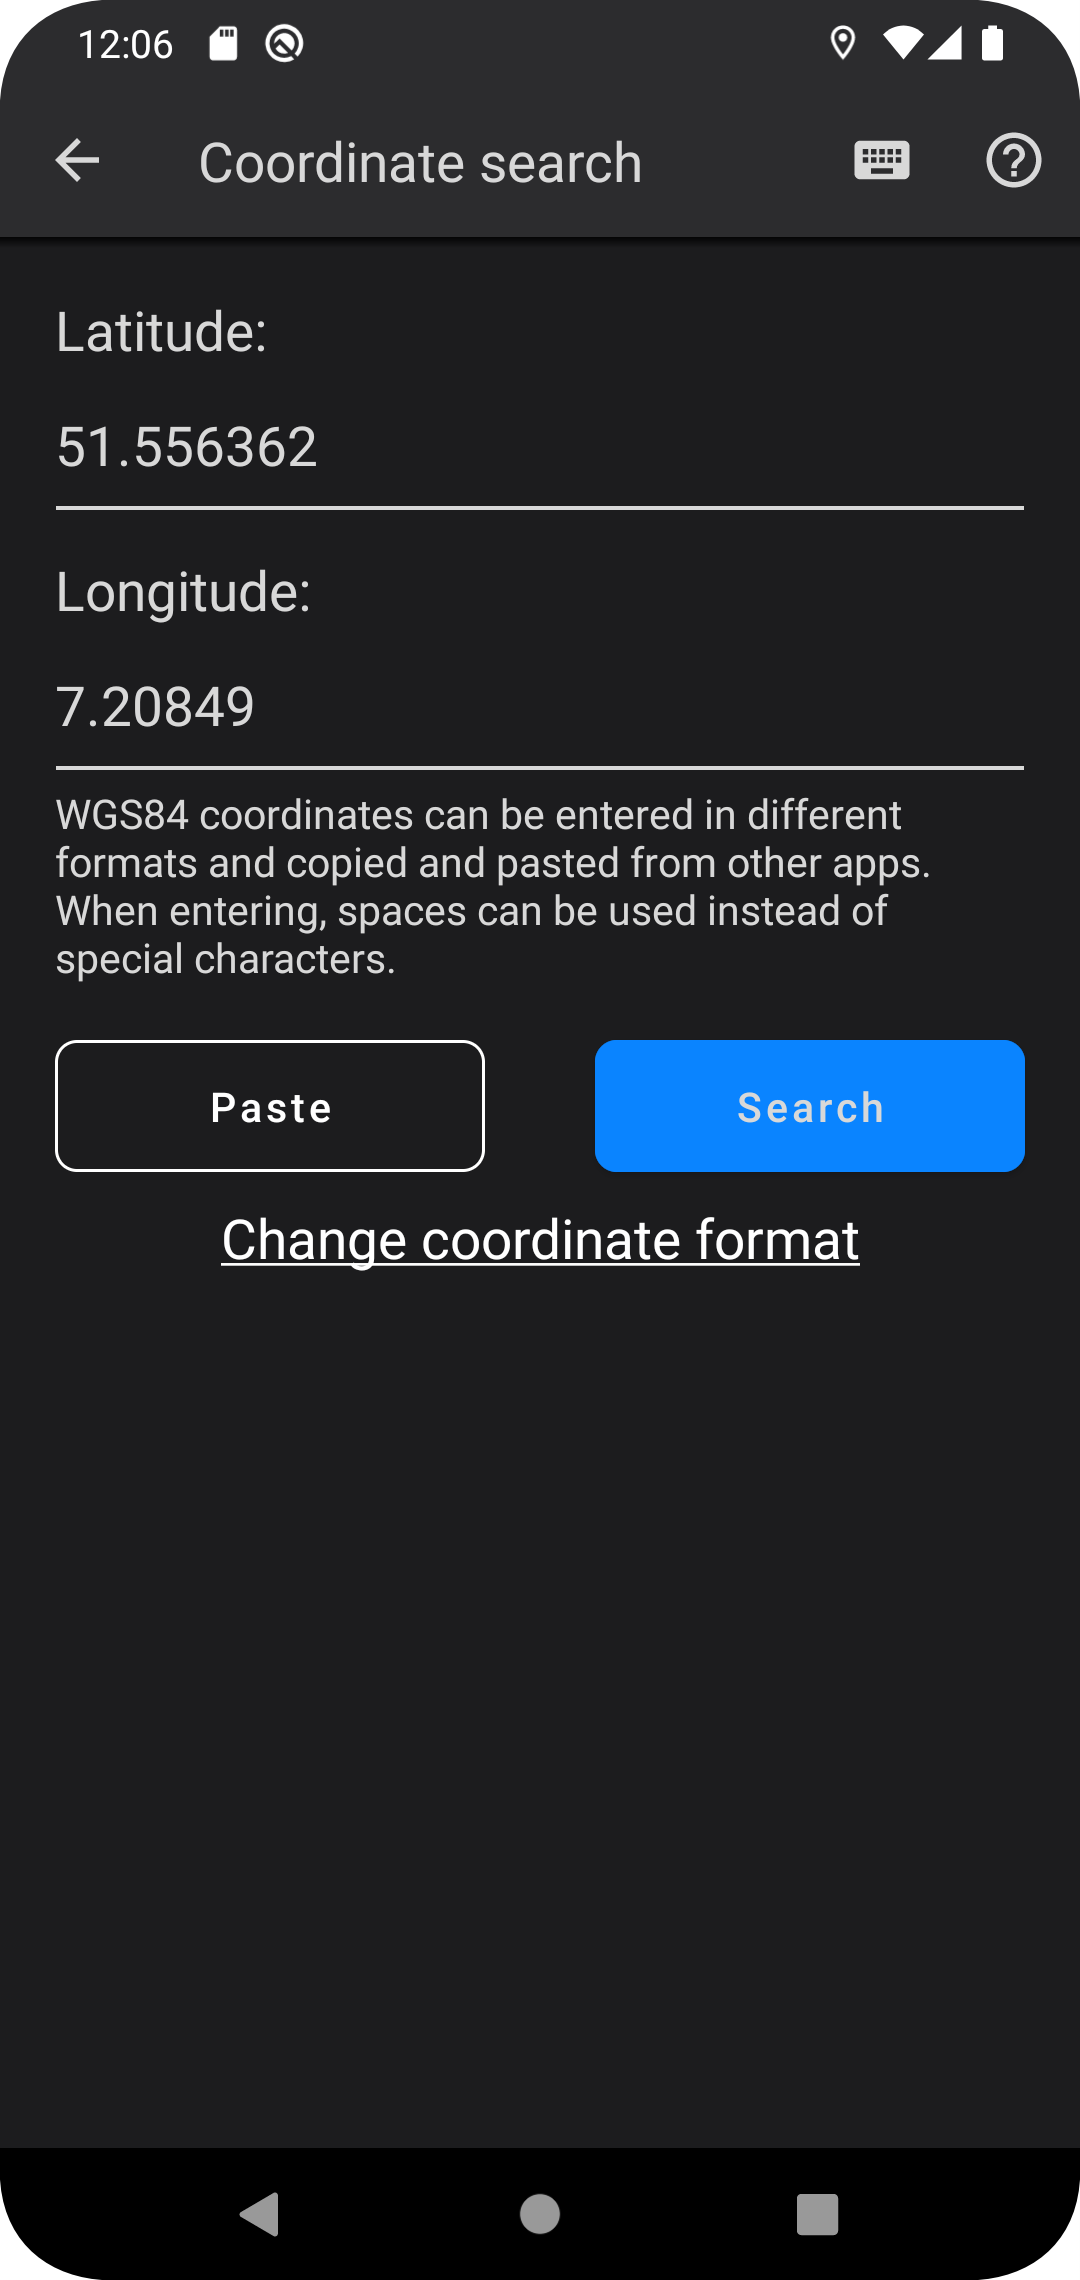
Navigate to Destination
The LB Geo Intent is an extension of the default geo intent. It transfers geo information to the Localion Navigator and processes these information depending on the requested action identifier (e.g. search a coordinate, display a location, calculate a route, etc.).
LBGeoIntentBuilder builder = new LBGeoIntentBuilder(new Intent());builder.setLocation("51.556362|7.208490");
builder.setAppStateValue(1);
builder.setName("Logiball GmbH");
Intent intent = builder.build();
startActivity(intent);
To customize the intent following parameters can be set:
Coordinate Input
To set the coordinate of the intent following line of code is required:
builder.setLocation(coordinateString);
The coordinate should be set up for this test case as follows: 51.556362|7.208490
Important for this entry would be the "|" character (dec .: 124 hex .: 7C). Thus, the latitude / longitude value is filtered and stored.
In particular following coordinate formats are supported:
51.556362|7.208490
51,556362|7,208490
51 556362|7 208490
51° 33' 22.9032"|7° 12' 30.564"
N 51° 33' 22.9032"|W 7° 12' 30.564"
51° 33' 22.9032 N|7° 12' 30.564" W
51 33 22.9032|7 12 30.564
51 33 22|7 12 30
Location entry point
If necessary for the destination it is possible to set a second coordinate that will be used to calculate the route to the destination. This option is available from version 2.4.0 of the Localion Navigator.
builder.setLocationsEntryPoint(coordinateString)
The coordinate formats supported for the coordinateString are identical to the ones usable for the coordinate input.
Location name
To set the name of the location following line of code is required:
builder.setName("nameString");
Zoom level
To set a custom zoom level following line of code is required. Possible values are 0 (whole world) to 21 (most detailed street level).
builder.setZoomLevel(17);
Dialog Text
The text dialog is an optional setting possibility. In case of use, the Navigator creates a dialog, based on the text, which can be dismissed. This is used to display information that must be transmitted via Intents.
Following code is required to set the delay:
builder.setText(optionalText);
Delays
There are two kind of delays - the dialog delay and the navigation delay.
The dialog delay defines the duration when the dialog disappears. A value of 5000 will show the dialog for 5 seconds. If no value or 0 is set, the dialog doesn't disappear automatically.
Following code is required to set the delay:
builder.setDialogDelayValue(dialogDelayValue);
The navigation delay defines the duration when the navigation starts automatically. A value of 5000 will start the navigation process after 5 seconds. If no value or 0 is set, the navigation process won't start automatically. The navigation delay only effects the appstates 4 and 41.
Following code is required to set the delay:
builder.setNavigationDelayValue(navigationDelayValue);
AppState Numbers
The AppState number defines the state in which the Localion Navigator appears after the intent was fired and can be defined via:
builder.setAppStateValue(appState);
This state is be ignored from version 3.0.0 onwards.
appState = 0
Starts the search through this AppState.
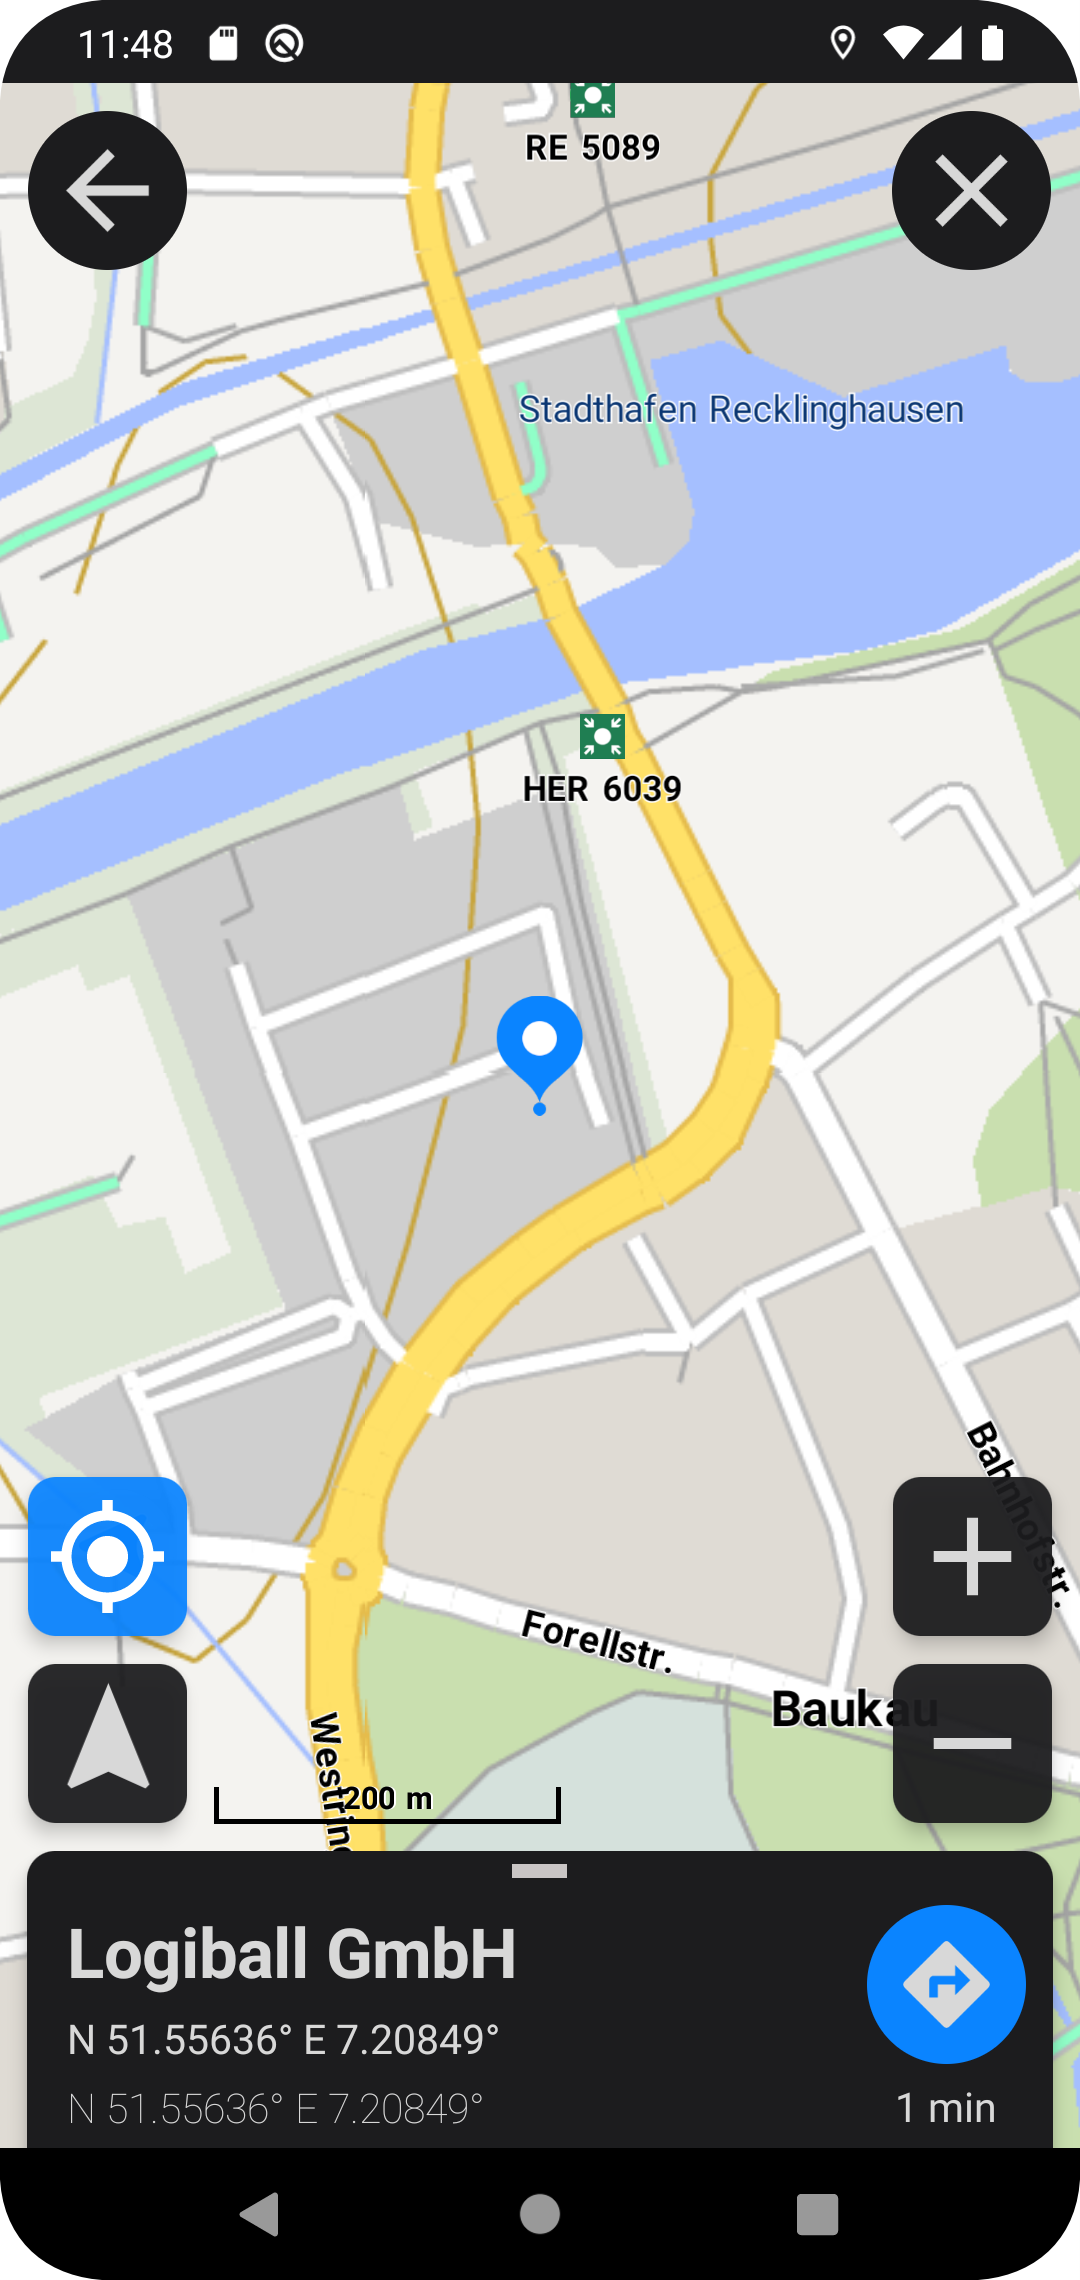
appState = 1
Immediately jump to the destination, with the following information: Target Distance, street name and city. When entering an address, the first search result is selected automatically. Addresses are no longer interpreted from version 3.0.0 onwards.
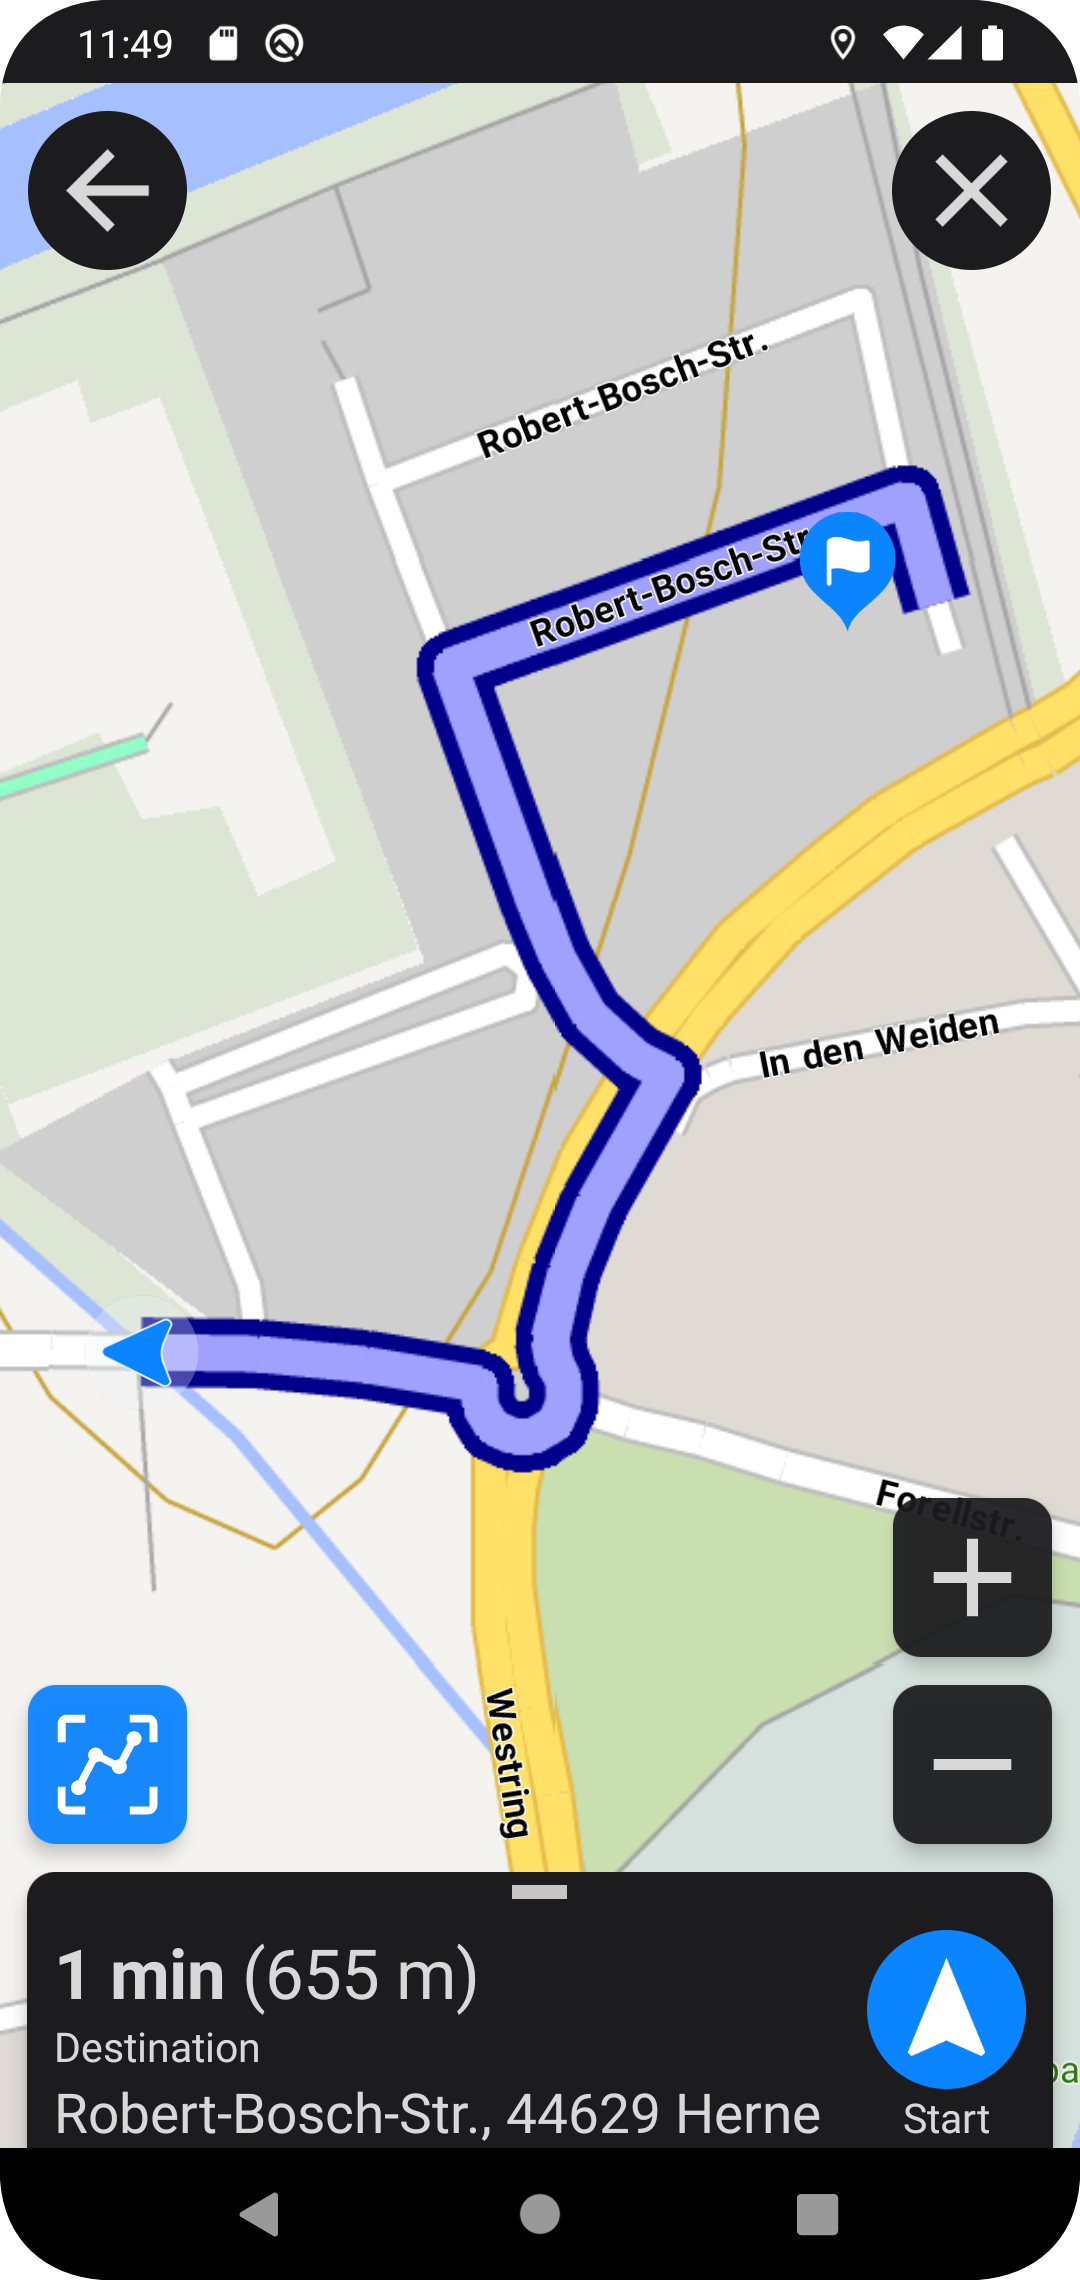
appState = 2
A route is calculated and displayed to the target point with coordinate input. When entering an address, the first search result is selected automatically. Addresses are no longer interpreted from version 3.0.0 onwards.
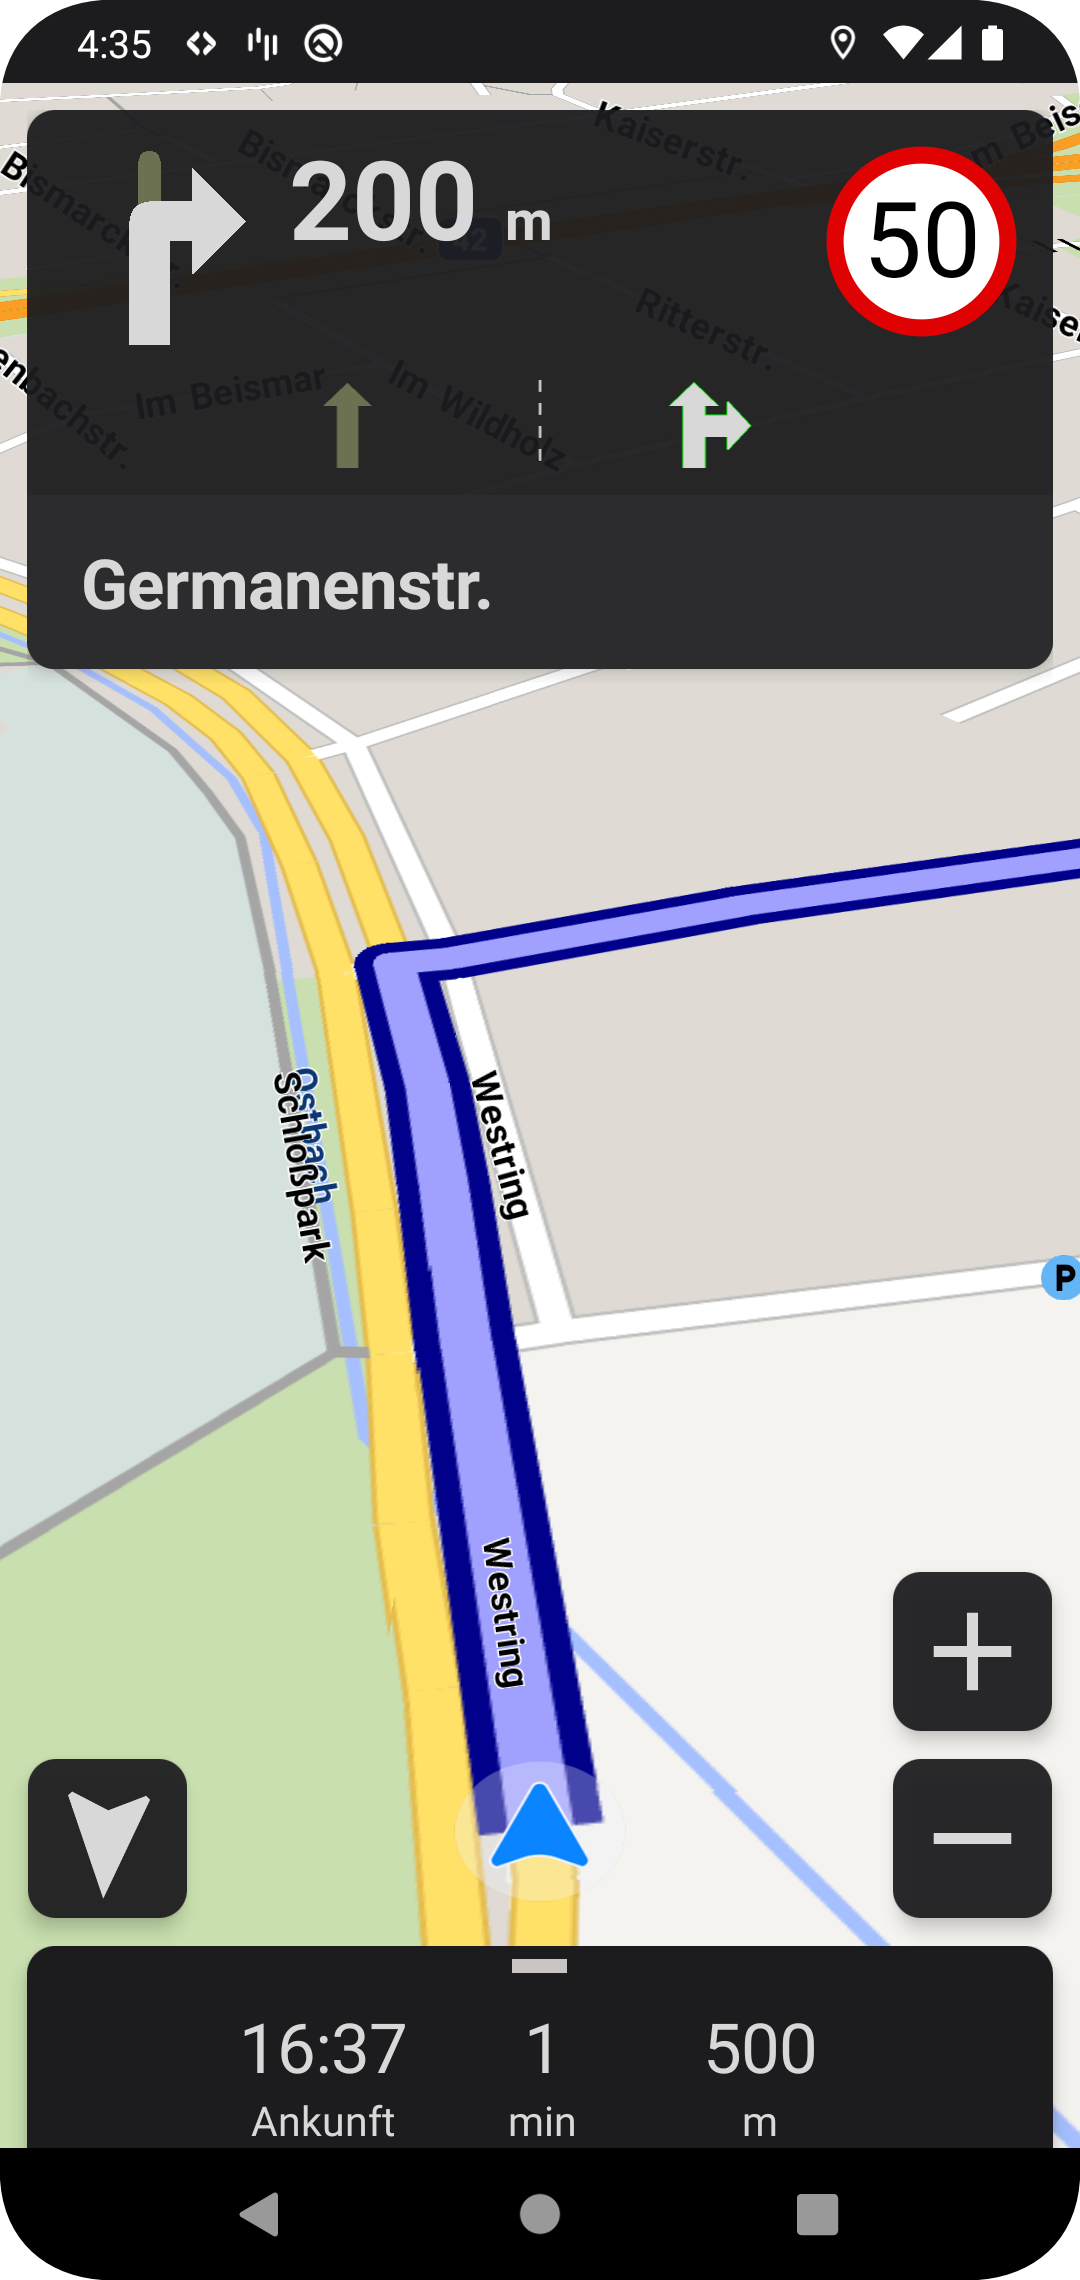
appState = 3
Navigation: A route will be calculated and the navigation will start immediately.
appState = 4
Delayed Navigation: A route will be calculated and shown on the map. The navigation will start after the delay elasped which was defined (default delay 5000ms).
appState = 31
Demo Navigation: Same behavior like AppState=3. Instead of a real navigation a demo starts.
appState = 41
Delayed Demo Navigation: Same behavior like AppState=4. Instead of a real navigation a demo starts.
appState = 5
Create Tour from Custom List: A tour will be created with custom entries from the user input. Concat the Latitude and Longitude value with "|". Concat all coordinates with an "&&&" at the end of every coordinate (Example: 51.7768|7.4688&&&51.5532|7.4732&&&).
appState = 51
Optimize Tour from Custom List and display on Map: Same behavior like AppState=5. The order of the destinations will be optimized.
appState = 6
Create Tour from imported json object: A tour will be created from pre defined json tour file.
appState = 61
Optimize Tour from Custom List and display on Map: Same behavior like AppState=6. The order of the destinations will be optimized.
Special rights
To allow the usage of emergency vehicles to perform emergency drives with special rights, you have to put the following flag to the intent bundle:
builder.setRoutingWithSpecialRights(true);
Legal information
This option is ignored from version 3.0.0 onwards.
To meet the legal requirements the Localion Navigator has to provide the possibility to notify the user about security notes and responsibility usage information. To show these security hints on app start you can define a flag which control the dialog creation.
To activate the legal hint you have to put the following flag to the intent bundle:
builder.setResponsibilityDialog(true);
Destination action
Since version 1.6.0 the Navigator allows to specify different destination actions. Destination actions define a specific task to execute when the final destination of a route was reached. Therefore these actions can only be set for navigation related geo intents (3 & 4).
-
Leave Navigation Mode (DestinationAction = 0): Immediately leave the navigation mode without performing any other custom action. If vehicle is still moving, the cruising mode will display the current street information.
-
Perform Custom Action (DestinationAction = 1): Execute a pending intent, that was passed to the original intent bundle. This allows the creator to perform any custom action.
-
Display Button (DestinationAction = 2): Display a button with the creator's application icon on the map. When the user clicks on the button its visibility will be disabled and a custom action will be executed. This custom action must be passed to the original intent bundle. This allows the creator to perform any custom action. Remind that selecting a new destination or starting a new navigation will disable the button's visibility as well.
To define a destination action you can use following code snippet for example:
// In this example an answer intent is created to perform any custom action - the specific action depends on your use cases
Intent answerIntent = new Intent(activity, MainActivity.class);
            answerIntent.setAction(Intent.ACTION_SEND);
            answerIntent.setType("myapp/destination_reached");
            answerIntent.setPackage(activity.getPackageName());
// The pending intent wraps your custom intent and will be executed by the Localion Navigator when the final destination was reached
PendingIntent pendingIntent = PendingIntent.getActivity(
            activity,
            0,
            answerIntent,
            PendingIntent.FLAG_ONE_SHOT & PendingIntent.FLAG_CANCEL_CURRENT);
// The pending intent can be passed to the Navigator
builder.setDestinationIntent(pendingIntent);
builder.setDestinationActionValue(1);
Pending Intents
Please remember that you have to add an intent filter for the answer intent of your pending intent to your Manifest to be able to process this intent. In addition, the processing of this intent must be implemented in the activity or service associated with your answer intent.
In regard to the example above, the Manifest would have to be extended by the intent filter:
<intent-filter>
       <action android:name="android.intent.action.SEND" />
       <category android:name="android.intent.category.DEFAULT" />
       <data android:mimeType="myapp/destination_reached" />
</intent-filter>
In the referenced MainActivity of the previous example, the onNewIntent(Intent intent)-method would have to be extended by the following:
public void onNewIntent(Intent intent) {
        final String receivedAction = intent.getAction();
        final String receivedType = intent.getType();
        if (receivedAction != null && receivedAction.equals(Intent.ACTION_SEND) && receivedType != null && receivedType.equals("myapp/destination_reached")) {
                    // do something - show a dialog for example
                    new AlertDialog.Builder(MainActivity.this).setMessage("Received intent from Navigator: Destination reached").create().show();
        }
}
On devices with Android version 14 (Upside Down Cake / API Level 34) you must additionally allow background execution of your pending intent using activity options. For example like this:
Bundle creatorOpts;
if (Build.VERSION.SDK_INT >= Build.VERSION_CODES.UPSIDE_DOWN_CAKE) {
    ActivityOptions options = ActivityOptions.makeBasic();
    options.setPendingIntentCreatorBackgroundActivityStartMode(ActivityOptions.MODE_BACKGROUND_ACTIVITY_START_ALLOWED);
    creatorOpts = options.toBundle();
} else {
    creatorOpts = null;
}
return PendingIntent.getActivity(
    context,
    0,
    intent,
    PendingIntent.FLAG_ONE_SHOT & PendingIntent.FLAG_CANCEL_CURRENT,
    creatorOpts
);
Otherwise your app will not be opened when your pending intent is send.
Stop Navigation
Since version 1.6 of the Navigator it is possible to stop the current navigation through an intent. The following code snippet ilustrates how an intent needs to be constructed to stop a navigation:
StopNavigationIntentBuilder builder = new StopNavigationIntentBuilder(intent);
builder.resetNavigatorVisibility(hide);
Intent intent = builder.build();
startActivity(intent);
The call of resetNavigatorVisibility(boolean hide) controls whether the navigator should be hidden after the navigation was stopped. True will restore the previous visibility of the navigator and false will keep the navigator visible. If not explicitly set the navigator will not be hidden. If not explicitly set the navigator will not be hidden.
Since version 2.1.0 of the Navigator it is possible to hide the dialog, that informs the user about the external navigation termination by this intent. If not explicitly set the navigator will show the dialog to inform the user that the navigation was terminated by this intent.
builder.setHideDialog(true);
POIs
Add custom POIs to map
Since version 1.3.0 the Localion Navigator supports the creation of POIs that show their name on the map and also use custom icons. To update the coordinates of existing POIs the intent can be sent again with new coordinates.
PoiIntentBuilder builder = new PoiIntentBuilder(new Intent());
Intent intent = builder.build();
startActivity(intent);
To define a POI one of the following methods can be used:
addPoi(long id, String name, boolean showOnMap, Uri iconUri, float horizontalCenter, float verticalCenter, double latitude, double longitude);
| Parameter | Type | Description | Example | Availability |
|---|---|---|---|---|
| id | long | The unique id of the POI that can be used to update the POI. Must be either -1 or a positive number greater than 0. If -1 is specified a new POI will be added with an available id. Prefer setting a specific id, as it allows updating and deleting POIs later. | 1 | |
| name | String | An optional name of the new POI that can be displayed as label below the POI icon on the map | "My Company Name" | |
| showOnMap | boolean | Flag that indicates if the specified name should be displayed as label below the POI icon on the map | false | |
| iconUri | Uri | The uri to an icon to display on the map. The icon must be a PNG image. Access to the icon must be granted to the Localion Navigator for the intent | "content://com.example.app/myPoiIcon.png" | Added since 3.0.0 |
| horizontalCenter | float | The horizontal icon center in percent that is required for map rotation | 0.5 | |
| verticalCenter | float | The vertical icon center in percent that is required for map rotation | 0.5 | |
| latitude | double | The latitude of the POI as decimal coordinate | 51.556362 | |
| longitude | double | The longitude of the POI as decimal coordinate | 7.208491 |
Attention: Creating a large number of POIs (greater than 100) using this intent should be done with multiple intents. Alternatively if you would like to use a larger number of POIs, please contact us at navigation@localion.de.
To display a back button with a specific button text, that opens a specific app, following code snippet can be used:
builder.setButtonText(String buttonText);
To define the app, that should be opened on button click, following method be used:
builder.setAppUrl(String appUrl);
To center the new POIs on the map by fitting the displayed area of the map so that it shows all new pois, following code snippet can be used:
builder.setShowPoisOnMap(boolean showPoisOnMap);
To define a custom zoom level following function can be called. Possible values are 0 (whole world) to 21 (most detailed street level). Please remind that the zoom level is only applied, if the previous flag to show the POIs on the map was set. Otherwise the zoom level is ignored. Please note that cutom zoom levels may result in not all POIs being displayed centred despite the centreMap flag being set. E.g. if a very large zoom level is set and not all POIs fit into this screen .
builder.setZoomLevel(17);
To apply a specific map rotation following function can be called. For the standard rotations use one of "North", "3d" or "Direction of travel".
builder.setRotation("North");
Since version 2.2.1 the Localion Navigator can also be hidden in some cases. To define that the navigator should be hidden after the intent was processed following function can be used. True will restore the previous visibility of the navigator and false will keep the navigator visible. If not explicitly set the navigator will not be hidden.
builder.resetNavigatorVisibility(true);
Delete POIs
Since version 2.2.0 the Localion Navigator is able to handle an intent that also allows other apps to remove previously added custom POIs. The POIs to delete need to be specified using their ids.
DeletePoisIntentBuilder builder = new DeletePoisIntentBuilder(new Intent());
long[] ids = new long[]{1, 3};
builder.setPoisToDelete(ids);
startActivity(builder.build());
It is also possible to remove all added custom POIs without specifing the specific ids:
DeletePoisIntentBuilder builder = new DeletePoisIntentBuilder(new Intent());
builder.deleteAll();
startActivity(builder.build());
Since version 2.2.1 the Localion Navigator can also be hidden in some cases. To define that the navigator should be hidden after the intent was processed following function can be used. True will restore the previous visibility of the navigator and false will keep the navigator visible. If not explicitly set the navigator will not be hidden.
builder.resetNavigatorVisibility(true);
Roadblocks
Add roadblocks to map
The roadblock intents may be used to create new roadblocks or override existing ones. Roadblocks can be created at specific coordinates or in specific areas.
The following code snippet may be used to create a single roadblock intent at a specific coordinate:
RoadblockIntentBuilder builder = new RoadblockIntentBuilder(new Intent());
builder.addRoadblock(1l, 51.2d, 7.1d, -1f, 0, new Date(1611052100603), new Date(1611053230603));
Intent intent = builder.build();
startActivity(intent);
Its parameters can be described as following:
| Parameter | Type | Description | Example | Availability |
|---|---|---|---|---|
| roadblockId | long | The unique id of the roadblock. If a roadblock with this id already exists, it will be overridden | 1 | |
| latitude | double | The roadblock's latitude as decimal coordinate | 51.556422 | |
| longitude | double | The roadblock's longitude as decimal coordinate | 7.208533 | |
| azimuth | float | The azimuth tells the Navigator in which direction the road should be blocked. -1 will block in both directions, otherwise it should be an angle in degrees, where 0° is north, 90° is east and so on. | -1 | |
| emergencyClass | int | The emergency class up to which the road block is effective from 0 (for all) to 9 (only default vehicles) | 0 | |
| startDate | Date | The date from which the roadblock is valid, if set to null the roadblock is active any time before the endDate | new Date(1611052100603) | |
| endDate | Date | The date until which the roadblock is valid, if set to null the roadblock is active any time after the startDate | new Date(1611053230603) | |
| hideNavigator | boolean | Flag that indicates if the navigator should be hidden after the intent was processed | true | Since version 2.2.1 |
Attention: Creating a large number of roadblocks (greater than 100) using this intent should be done with multiple intents.
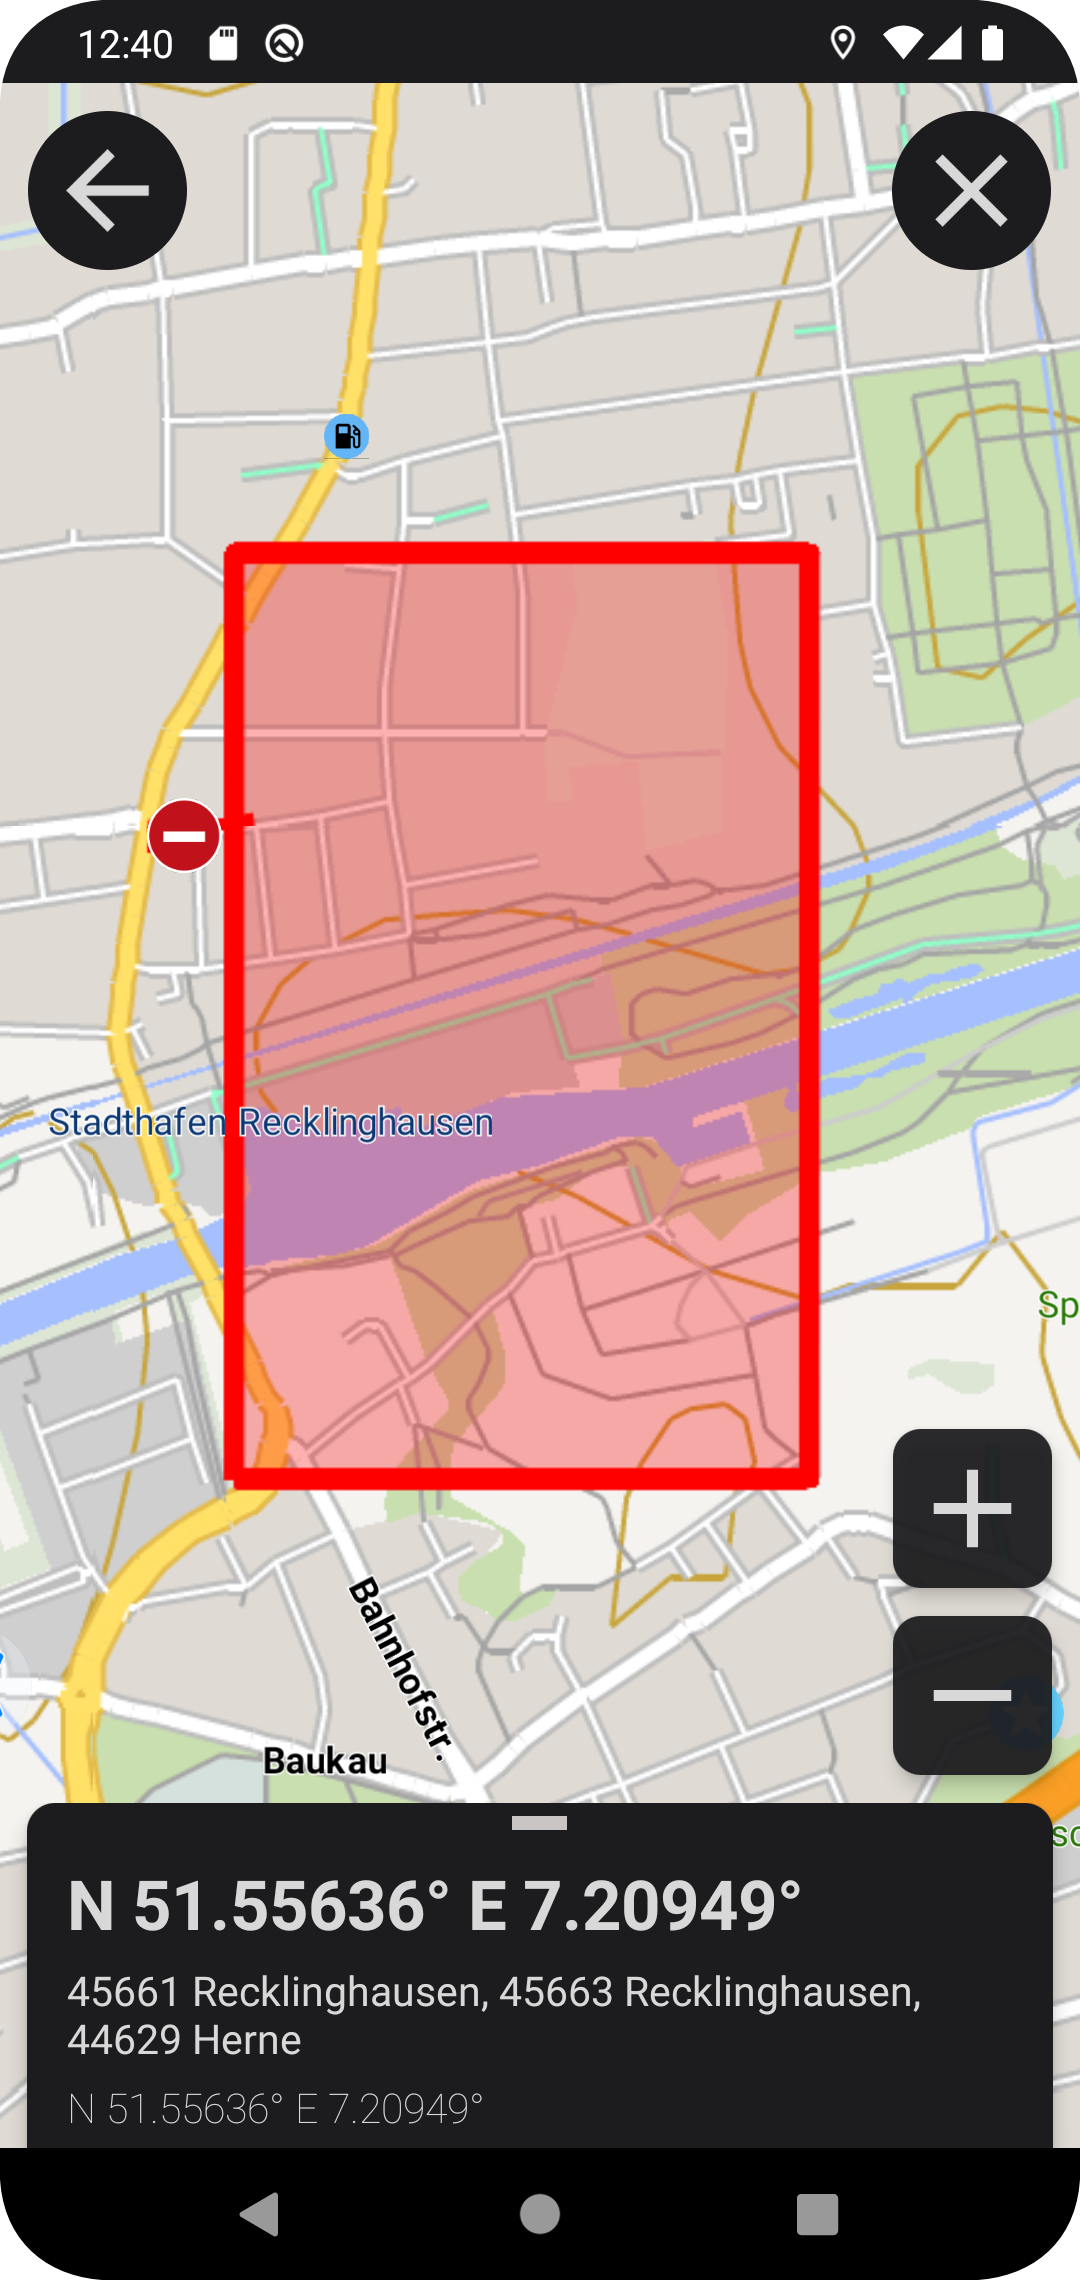
The following code snippet may be used to create a roadblock intent to block a whole area:
RoadblockPolygonIntentBuilder builder = new RoadblockPolygonIntentBuilder(new Intent());
long roadblockId = 27L;
List<Pair<Double, Double>> polygonCoordinates =
    new ArrayList(Arrays.asList(new Coordinate[]{
        new Coordinate(51.71d, 9.12d),
        new Coordinate(51.75d, 9.12d),
        new Coordinate(51.75d, 9.16d)}));
boolean ingoingStreets = true;
boolean outgoingStreets = false;
int emergencyClass = 0;
Date startDate = new Date(1611052100603);
Date endDate = new Date(1611053230603);
builder.addRoadblock(roadblockId, polygonCoordinates, blockIngoingStreets, blockOutgoingStreets, emergencyClass, startDate, endDate);
Intent intent = builder.build();
startActivity(intent);
Its parameters can be described as following:
| Parameter | Type | Description | Example | Availability |
|---|---|---|---|---|
| roadblockId | long | The unique id of the roadblock. If a roadblock with this id already exists, it will be overridden | 1 | |
| polygonCoordinates | double | The polygon's coordinates (at least 3) | {(51.71d, 9.12d), (51.75d, 9.12d), (51.75d, 9.16d)} | |
| ingoingStreets | boolean | Flag that indicates if all edges leading into the polygon should be closed | true | |
| outgoingStreets | boolean | Flag that indicates if all edges leading out of the polygon should be closed | false | |
| emergencyClass | int | The emergency class up to which the road block is effective from 0 (for all) to 9 (only default vehicles) | 0 | |
| startDate | Date | The date from which the roadblock is valid | new Date(1611052100603) | |
| endDate | Date | The date until which the roadblock is valid | new Date(1611053230603) | |
| hideNavigator | boolean | Flag that indicates if the navigator should be hidden after the intent was processed | true | Since version 2.2.1 |
Alternatively, a GeoJson with a polygon and the additional blocking parameters can be used:
{
  "type": "FeatureCollection",
  "features": [
    {
      "type": "Feature",
      "properties": {
        "id": 18,
        "ingoing": true,
        "outgoing": true,
        "emergencyClass": 0,
        "startDate": 0,
        "endDate": 0
      },
      "geometry": {
        "type": "Polygon",
        "coordinates": [
          [
            [
              7.203640937805176,
              51.55052491187259
            ],
            [
              7.201495170593263,
              51.54798968998553
            ],
            [
              7.205700874328613,
              51.547215752000376
            ],
            [
              7.207674980163574,
              51.5489504222725
            ],
            [
              7.203640937805176,
              51.55052491187259
            ]
          ]
        ]
      }
    },
    {
      "type": "Feature",
      "properties": {
        "id": 19,
        "ingoing": true,
        "outgoing": false,
        "emergencyClass": 0,
        "startDate": 0,
        "endDate": 0
      },
      "geometry": {
        "type": "Polygon",
        "coordinates": [
          [
            [
              7.303640937805176,
              51.65052491187259
            ],
            [
              7.301495170593263,
              51.64798968998553
            ],
            [
              7.305700874328613,
              51.647215752000376
            ],
            [
              7.307674980163574,
              51.6489504222725
            ],
            [
              7.303640937805176,
              51.65052491187259
            ]
          ]
        ]
      }
    }
  ]
}
This json can be passed via:
RoadblockPolygonIntentBuilder builder = new RoadblockPolygonIntentBuilder(new Intent());
builder.addPolygonJson(yourJsonAsString);
Intent intent = builder.build();
startActivity(intent);
Blocked polygons will look like this:
Delete roadblocks
This intent can be used to delete existing roadblocks by their ids.
The following code snipped may be used to create the intent:
DeleteRoadblockIntentBuilder builder = new DeleteRoadblockIntentBuilder(new Intent());
builder.addRoadblockId(1l);
Intent intent = builder.build();
startActivity(intent);
To delete all existing roadblocks following code snippet can be used:
builder.deleteAllRoadblocks();
And to ask the user to confirm the deletion following code snippet can be used:
builder.requireConfirmation();
Since version 2.2.1 the Localion Navigator can also be hidden in some cases. To define that the navigator should be hidden after the intent was processed following function can be used. True will restore the previous visibility of the navigator and false will keep the navigator visible. If not explicitly set the navigator will not be hidden.
builder.resetNavigatorVisibility(true);
Disable roadblocks
This intent can be used to disable existing roadblocks temporary by their ids. Disabled roadblocks will be still displayed in alternate colors in the roadblock list, but the roadblock won't be considered during routing and won't be displayed on the map.
The following code snipped may be used to create the intent:
DisableRoadblockIntentBuilder builder = new DisableRoadblockIntentBuilder(new Intent());
builder.addRoadblockId(1l);
Intent intent = builder.build();
startActivity(intent);
To disable all existing roadblocks following code snippet can be used:
builder.disableAllRoadblocks();
And to ask the user to confirm the visibility modification following code snippet can be used:
builder.requireConfirmation();
Since version 2.2.1 the Localion Navigator can also be hidden in some cases. To define that the navigator should be hidden after the intent was processed following function can be used. True will restore the previous visibility of the navigator and false will keep the navigator visible. If not explicitly set the navigator will not be hidden.
builder.resetNavigatorVisibility(true);
Enable roadblocks
This intent can be used to enable disabled roadblocks by their ids.
The following code snipped may be used to create the intent:
EnableRoadblockIntentBuilder builder = new EnableRoadblockIntentBuilder(new Intent());
builder.addRoadblockId(1l);
Intent intent = builder.build();
startActivity(intent);
To enable all existing roadblocks following code snippet can be used:
builder.enableAllRoadblocks();
And to ask the user to confirm the visibility modification following code snippet can be used:
builder.requireConfirmation();
Since version 2.2.1 the Localion Navigator can also be hidden in some cases. To define that the navigator should be hidden after the intent was processed following function can be used. True will restore the previous visibility of the navigator and false will keep the navigator visible. If not explicitly set the navigator will not be hidden.
builder.resetNavigatorVisibility(true);
Get Geo Information
Since version 1.3.0 the Localion Navigator provides the possibility to share geo information with partner apps. To receive these information the user has to allow this communication channel in the advanced settings "Allow communication with other apps".
To create a single request, following code snippet can be used:
LBGeoRequestIntentBuilder builder = new LBGeoRequestIntentBuilder()
builder.setResponseClass(className)
builder.setResponsePackage(packageName);
Intent intent = builder.build();
startActivity(intent);
To address the response intent the class and the package name of the activity, which will receive the response from the Localion Navigator, must be set.
To receive the response two files must be modified:
-
Manifest: An intent filter must be added in the block of the activity that should receive the response:
<intent-filter> <action android:name="android.intent.action.SEND" /> <category android:name="android.intent.category.DEFAULT" /> <data android:mimeType="lb/single_response" /> </intent-filter> -
Activity: The onNewIntent() method must be overridden to receive the result intent:
@Override
public void onNewIntent(Intent intent) {

 // Handle the intent data
 final String receivedAction = intent != null ? intent.getAction() : "";
 final String receivedType = intent != null ? intent.getType() : "";

 // Make sure it's an action and type we can handle
 if (receivedAction.equals(Intent.ACTION_MAIN)) {
  // Handle the default case - the app was just opened via the app drawer
  return;
 } else if (receivedAction.equals(Intent.ACTION_SEND)) {
  if (receivedType.equals("LB_TYPE_SINGLE_RESPONSE")) {
    // Handle the response with own implementation
    // The intent information are stored in the intent bundle
    // An example how to process the information can be found in the following chapter
    processInformationIntent(intent);
  }
 }
}
The response intent's bundle contains following geo information:
| Key | Type | Description | Default Value | Example Value |
|---|---|---|---|---|
| LB_DESTINATION | String | Concatenated destination names which are separated by commas | "" | "Herne Bahnhof, Logiball GmbH" |
| LB_ETA_TOTAL | long | Estimated time of arrival for the whole route/tour as unix time stamp (milliseconds) | 0 | 1611053230603 |
| LB_ETA_NEXT | long | Estimated time of arrival for the next destination as unix time stamp (milliseconds) | 0 | 1611052100603 |
| LB_REMAINING_DISTANCE_TOTAL | double | Remaining distance of the whole route / tour (meters) | 0 | 8312 |
| LB_REMAINING_DISTANCE_NEXT | double | Remaining distance to the next destination (meters) | 0 | 3190 |
| LB_CURRENT_POSITION | String | The current decimal coordinate as concatenated floating points that are separated with a comma (WGS84 Decimal Coordinate) | "" | "51.556422, 7.208533" |
| LB_CURRENT_POSITION_LAT | double | The latitude of the current decimal coordinate | 0.0 | 51.556422 |
| LB_CURRENT_POSITION_LON | double | The longitude of the current decimal coordinate | 0.0 | 7.208533 |
| LB_IS_NAVIGATING | boolean | True, if a navigation process is currently active, otherwise false | false | true |
| LB_CURRENT_SPEED | int | The current speed in km/h | 0 | 50 |
| LB_SPEED_LIMIT | int | The current speed limit in km/h | 0 | 50 |
| LB_EVENT_TYPE | String | Is always set - available causes: Single Request, Navigation Started, Navigation Ended, Next destination Reached, Final destination Reached, Rerouting started, Estimated time of arrival changed | One of the mentioned types | "Next destination Reached" |
To extract these information following code snippet can be used:
/**
 * Processes the geo information intent of the Localion Navigator
 *
 * @param intent The broadcast information
 */
public void processInformationIntent(Intent intent) {

    if (intent == null) {
        // Received invalid response");
    } else {
        // Read the bundle information
        String destinations = intent.getStringExtra(LB_KEY_DESTINATION);
        long etaTotal = intent.getLongExtra(LB_KEY_ETA_TOTAL, 0l);
        long etaNext = intent.getLongExtra(LB_KEY_ETA_NEXT, 0l);
        double distanceTotal = intent.getDoubleExtra(LB_KEY_REMAINING_DISTANCE_TOTAL, 0d);
        double distanceNext = intent.getDoubleExtra(LB_KEY_REMAINING_DISTANCE_NEXT, 0d);
        String position = intent.getStringExtra(LB_KEY_CURRENT_POSITION);
        double latitude = intent.getDoubleExtra(LB_KEY_CURRENT_POSITION_LAT, 0d);
        double longitude = intent.getDoubleExtra(LB_KEY_CURRENT_POSITION_LON, 0d);
        boolean isNavigating = intent.getBooleanExtra(LB_KEY_IS_NAVIGATING, false);
        String eventType = intent.getStringExtra(LB_KEY_EVENT_TYPE);
    // Do something with the collected information ...
    }
}
Receive Geo information
To register a broadcast receiver, that continuously receives geo information, following code snippet can be used:
BroadcastReceiver broadcastReceiver = new BroadcastReceiver() {
    @Override
    public void onReceive(Context context, Intent intent) {
    // Handle the response with own implementation
    // The broadcast information are stored in the broadcast bundle
    // An example how to process the information can be found in the following chapter
        processInformationIntent(intent);
    }
};
IntentFilter intentFilter = new IntentFilter();
intentFilter.addAction("lb/geo_broadcast_request");
activity.registerReceiver(broadcastReceiver, intentFilter);
This broadcast receiver will receive the same information as the single request. So the content of the broadcasts and the processing are equal to the previous single response processing. The broadcast is sent when: - a navigation was started - a navigation has ended - the expected arrival time changed - an intermediate destination of a tour has been reached - the last destination of a tour has been reached In order to receive more frequent updates, the Geo Information Intent can be sent at any time. This manually trigger will send the current geo information.
Update theme
Since Version 2.2.2 of the navigator it is possible to update the app theme. There are five different ways to control which theme is applied to the Localion Navigator (the same ones that can be set as in the presentation settings).
| Mode | Description |
|---|---|
| AUTO_LIGHT | From 3.0 onwards not interpreted anymore, instead will default to AUTO_TIME. Used to set the theme automatically by the light sensor and the day time. Applies the dark theme in dark areas and in the evening / night. Applies the light theme in light areas and during the day. |
| AUTO_TIME | Used to set the theme automatically by the day time. Applies the dark theme in the evening / night. Applies the light theme in light areas and during the day. |
| DAY | Used to force the usage of the light day theme (always) |
| NIGHT | Used to force the usage of the dark night theme (always) |
| AUTO_OS | Used to set the theme automatically by the os. Note: Was not interpreted in versions from 3.0.0 to 3.0.3, instead defaulted to AUTO_TIME. |
The following example shows how to create and send the update theme intent:
UpdateThemeIntentBuilder intentBuilder = new UpdateThemeIntentBuilder(new Intent());
Intent intent = intentBuilder.setThemeMode(UpdateThemeIntentBuilder.ThemeUpdateMode.NIGHT).build();
startActivity(intent);
Since version 2.2.1 the Localion Navigator can also be hidden in some cases. To define that the navigator should be hidden after the intent was processed following function can be used. True will restore the previous visibility of the navigator and false will keep the navigator visible. If not explicitly set the navigator will not be hidden.
intentBuilder.resetNavigatorVisibility(true);
Close app
Since Version 2.2.2 of the navigator it is possible to close the Localion Navigator. The following example shows how to create and send the close app intent:
Intent intent = new CloseAppIntentBuilder(new Intent()).build();
startActivity(intent);
Download and update maps
Since Version 2.3.0 of the navigator it is possible to initiate automatic map downloads and updates, which are configured in a compatible MDM. More details about the automatic map download and the setup in the MDM can be found in the Managed Configuration Guide. To start the map download the following intent can be used:
Intent intent = new DownloadMapsIntentBuilder(new Intent()).build();
startActivity(intent);
Apply bottom padding
Since Version 2.6.0 of the navigator it is possible to define a bottom padding for the whole app. This padding can be used to create an empty area in which additional system contents can be shown. The padding must be a positive integer in pixels. This padding will be kept until a new value is passed to the navigator. So on the next app start there is no need to pass the same padding again unless it should be updated to a new value.
To apply a bottom padding the following intent can be used:
Intent intent = new SetupPaddingIntentBuilder(new Intent()).setBottomPadding(50).build();
startActivity(intent);
Allow emergency vehicles
Since Version 2.6.2 of the navigator it is possible to allow the user to create emergency vehicles. It is prefereable to allow emergency vehicles through managed configurations if possible. Allowing emergency vehicles through at least one of these channels will allow their creation as vehicle profiles. Allowing emergency vehicles through at least one channel will create a vehicle profile that is of type emergency vehicle if none exist.
Disallowing the emergency vehicles again will not delete existing vehicle profiles with type emergency profile. This has to be done manually.
To allow emergency vehicles the following intent can be used:
Intent intent = new EmergencyVehicleAllowedIntentBuilder(new Intent()).setAllowed(true).build();
startActivity(intent);
Legacy Intents
Not all intents are supported in the current version of the navigator. The following intents are not supported:
Supported up to version 2.6.5
These intents were supported up to version 2.6.5 and are not supported in the current version of the navigator.
Navigate Tour
The tour intent passes a tour to the navigator, calculates a route to its stations and displays the route on the map. The tour either can be passed as concatenated location list string or as json.
-
Location List: To pass a concatenated list of locations (coordinates / addresses) following lines of code can be used:
The location list consists of the concatenated coordinates. Each coordinate consists of the latitude, the separator | and the longitude. The coordinates should be separated by &&&.LBTourIntentBuilder builder = new LBTourIntentBuilder(new Intent()); builder.setAppStateValue(5); builder.setTourStations(locationString); builder.setName(nameString); Intent intent = builder.build(); startActivity(intent);To display custom names for the coordinates an additional name list can be passed. The name list consists of the concatenated station names. The names should be separated by &&&.builder.setTourStations("52.369558|9.723722&&&52.369558|9.723722&&&52.431444|13.538599");builder.setName("Logiball Niederlassung Herne&&&Logiball Niederlassung Hannover&&&Logiball Niederlassung Berlin"); -
Json File: To pass a geojson geojson file to the Localion Navigator following lines of code can be used:
Please ensure that the navigator is allowed to acces the passed uri. Otherwise it is recommended to use following method instead:LBTourIntentBuilder builder = new LBTourIntentBuilder(new Intent()); builder.setAppStateValue(6); builder.setTourUri(tourUri); Intent intent = builder.build(); startActivity(intent);Then the builder itself will manage the permission handling by callingbuilder.setTourUriAndGrantPermission(tourUri, activity);activity.grantUriPermission(getPackage(), tourUri, Intent.FLAG_GRANT_READ_URI_PERMISSION);
Add Destination to Tour
Since version 1.3.0 the Localion Navigator supports an intent that allows to add an intermediate target to the current tour being executed, either as the next or as the last target.
InsertTargetIntentBuilder builder = new InsertTargetIntentBuilder(new Intent());
Intent intent = builder.build();
startActivity(intent);
The target to add can be passed as:
- concatenated coordinate string:
builder.setTarget("52.369558&&&9.723722"); - separated latitude and longitude string:
builder.setTarget("52.369558", "9.723722"); - separated latitude and longitude string / double:
builder.setTarget(52.369558d, 9.723722d);
An optional name to display for the target can be defined as String via:
builder.setName("New Customer Name");
To define if the new target should be added as the next tour station or as the last station following function can be used to pass the flag as boolean:
builder.setAddAsNextTarget(true);
If no flag is defined, the target will be added as last station.
To define if the user of the Localion Navigator will be asked if they want to add the new target to the current tour following line can be added to pass the flag as boolean:
builder.setRequiresUsersAcceptance(true);
If no flag is defined, the user won't be asked.
To receive a callback when the target was added or not a PendingIntent can be defined. When processing of the intent is finished the Localion Navigator will use the given pending intent (if one was given), to tell notify the receive of the pending intent, if the target was actually added, to allow the sender of the original intent to keep their data in sync with the actual tour being executed by the Localion Navigator. That intent will have the success flag in its extra bundle. The flag can be get with the key RESULT.
Full example:
InsertTargetIntentBuilder builder = new InsertTargetIntentBuilder(new Intent());
builder.setTarget("52.369558", "9.723722")
Intent answerIntent = new Intent(activity, MainActivity.class);
            answerIntent.setAction(Intent.ACTION_SEND);
            answerIntent.setType("myapp/targetAdded");
            answerIntent.setPackage(activity.getPackageName());
// The pending intent wraps your custom intent and will be executed by the Localion Navigator when the final destination was reached
PendingIntent pendingIntent = PendingIntent.getActivity(
            activity,
            0,
            answerIntent,
            PendingIntent.FLAG_ONE_SHOT & PendingIntent.FLAG_CANCEL_CURRENT);
builder.setAnswerIntent(pendingIntent);
Intent intent = builder.build();
startActivity(intent);
Order Destinations
Since version 1.6.0 the Localion Navigator supports the processing of optimization requests. To use the optimization API this feature must be licensed and a connection to the LOGIBALL backend is required. If the network connection is good enough the optimization will be performed by a web service for you, otherwise the optimization will be calculated by your device. To ensure that the license can be validated and the optimization will be performed by the API it is recommended to pass credentials to the optimization intent (further information).
LBTourIntentBuilder builder = new LBTourIntentBuilder(new Intent());
builder.setAppStateValue(51);
builder.setTourUri(tourUri);
Intent intent = builder.build();
startActivity(intent);
To optimize a given tour file or station list the specific optimization state must be set:
-
Optimize Tour from Custom List and display the result (AppState = 51): A tour will be created with custom entries from the user input optimized and displayed on the map. Concat the Latitude and Longitude value with "|". Concat all coordinates with an "&&&" at the end of every coordinate (Example: 51.7768|7.4688&&&).
-
Optimize Tour from imported json object and display the result (AppState = 61): A tour will be created from pre defined json tour file, optimized and displayed on the map.
-
Optimize Tour from Custom List and return the result (AppState = 52): A tour will be created with custom entries from the user input, optimized and returned to the requester.. Concat the Latitude and Longitude value with "|". Concat all coordinates with an "&&&" at the end of every coordinate (Example: 51.7768|7.4688&&&).
-
Optimize Tour from imported json object and return the result (AppState = 62): A tour will be created from pre defined json tour file, optimized and returned to the requester.
Code-snippet to set the specific state:
builder.setAppStateValue(52);
To include the current position for the optimization calculation another flag can be added:
builder.setIncludeCurrentPosition(true);
To optimize the last station of the tour as well another flag is required (otherwise the last station is fixed and its position won't be optimized):
builder.setOptimizeLastStation(true);
To receive the optimization result as intent (AppState 52 Optimize Tour from Custom List or 62 Optimize Tour from File) the application id of your own app must be set. If no receiver is set, the optimized tour will be displayed on the map. The application id can be set via:
builder.setOptimizationReceiver("de.myapp.id");
The result intent consists of following components:
    action: "android.intent.action.SEND"
    type: "lb/optimization_response"
    bundle:
        success flag: Boolean with key "geo/extended/optimizationSuccess"
        optimization message: String with key "geo/extended/optimizationMessage"
The bundle contains a success flag and an optimization message. If the optimization succeeded the message is formatted as json and contains several tour attributes. Otherwise the message contains a short failure description.
The json-result contains the optimized order as an array of waypoints. Each waypoint consist of the original index (customId) and its coordinate. The scheme is defined as:
metaInfo
object (metaInfo)
Meta information about the executed operation

    timestamp
    string <date-time>
    Date and time of the request execution

status
object (status)
Result status of the executed operation

      code
      required
      string
      Response status code. (e.g. 10200)

      message
      string
      A short message which describes the status.

      moreInfo
      string
      An optional link to more details in the documentation.

      errorInfos
      object (errorInfos)
      Contains information if the request could not be processed (if available).

debugResponse
string
yet unused

sequence
object (sequence)
The resulting sequence with additional information

    waypoints
    Array of object (waypoints)
    A series of waypoints

        Array [
            customId
            string
            User defined identifier for identifying the location in the response.

            coordinate
            required
            Array of number <double> 2 items
            The first element is longitude (easting) and the second one is latitude (northing).

            Note: This coordinate follows the RFC 7946 (section 3.1.1) specification with the exception that the optional third element altitude or elevation is missing.

            azimuth
            object (locationAzimuth)
            The azimuth is used to restrict the direction of travel approaching or leaving this location. The azimuth is the angle to the north pole along the horizon in
      degrees, increasing clockwise (North 0.0°, East 90.0°, South 180.0°, West 270.0°). A difference of up to 23° to the found street is tolerated.
        ]

        distance
        integer <int32>
        Distance of the route.

        duration
        string
        Estimated duration as specified in RFC 3339

        timeOfArrival
        string <date-time> (timeOfArrival)
        Arrival date-time as defined in RFC 3339

        timeOfDeparture
        string <date-time> (timeOfDeparture)
        Departure date-time as defined in RFC 3339

        statistics
        object (routeStatistics)
        Statistical information about the calculated route

        distanceFederalRoad
        integer <int32>
        Route distance using federal roads [m]

        directLine
        integer <int32>
        Direct line distance [m]

        distanceMotorway
        integer <int32>
        Route distance using motorways [m]

        distanceCity
        integer <int32>
        Route distance using city roads [m]

        distanceFerry
        integer <int32>
        Route distance using ferries [m]

        distanceTunnel
        integer <int32>
        Route distance using tunnels [m]

        distanceTollstreet
        integer <int32>
        Route distance using tollstreets [m]

        distanceCartrain
        integer <int32>
        Route distance using cartrains [m]

        averageSpeed
        integer <int32>
        Average speed using the route [km/h]

        distanceMotorwayBAB
        integer <int32>
        Route distance using BAB [m]

        distancePreferredForestRc6
        integer <int32>
        Route distance using rural ways [m]

        distancePreferredForestRc7
        integer <int32>
        Route distance using very rural ways [m]

        distanceRc
        Array of integer <int32>
        deltaUp
        integer <int32>
        Height difference [m]

        deltaDown
        integer <int32>
        Height difference [m]

        maxGradeUp
        integer <int32>
        Highest uphill grade on the route

        maxGradeDown
        integer <int32>
        Highest downhill grade on the route

    geometry
    object (geoJsonGeometry)
    A geometry described by a GeoJson object.

        type
        required
        string (geoJsonGeometryType)
        Enum:"Point" "LineString" "MultiPoint" "Polygon" "MultiLineString" "MultiPolygon" "GeometryCollection"

        coordinates
        required
        Array of Array of number (geoJsonCoordinate) >= 2 items

    legs
    Array of object (routeLegs)
    Legs of the route.
    Every leg contains the geometry of the leg and some statistical information.

        Array [
            distance
            integer <int32>
            Distance of the leg. [m]

            duration
            string
            Duration of the leg as specified in RFC 3339

            timeOfArrival
            string <date-time>
            Arrival date-time as defined in RFC 3339

            timeOfDeparture
            string <date-time>
            Departure date-time as defined in RFC 3339

            statistics
            object (routeStatistics)
            Statistical information about the calculated route

            geometry
            object (geoJsonGeometry)
            A geometry described by a GeoJson object.
      ]
For example:
{
  "metaInfos": {
    "timestamp": "2019-10-28T09:20:03.834Z"
  },
  "status": {
    "code": "10200",
    "message": "OK"
  },
  "sequence": {
    "waypoints": [
      {
        "customId": "0",
        "coordinate": [
          7.520482,
          51.489553
        ]
      },
      {
        "customId": "2",
        "coordinate": [
          7.518904,
          51.494904
        ]
      },
      {
        "customId": "1",
        "coordinate": [
          7.517145,
          51.506062
        ]
      },
      {
        "customId": "3",
        "coordinate": [
          7.526741,
          51.480814
        ]
      }
    ],
    "distance": 10649,
    "duration": "PT00H19M19S",
    "timeOfArrival": "2019-10-28T09:39:22.000Z",
    "timeOfDeparture": "2019-10-28T09:20:03.000Z",
    "statistics": {
      "distanceFederalRoad": 2556,
      "directLine": 5767,
      "distanceMotorway": 0,
      "distanceCity": 10649,
      "distanceFerry": 0,
      "distanceTunnel": 0,
      "distanceTollstreet": 0,
      "distanceCartrain": 0,
      "averageSpeed": 33,
      "distanceMotorwayBAB": 0,
      "distancePreferredForestRc6": 0,
      "distancePreferredForestRc7": 0,
      "distanceRc": [
        0,
        2967,
        1970,
        0,
        5304,
        407,
        0,
        0
      ],
      "deltaUp": 0,
      "deltaDown": 0,
      "maxGradeUp": 0,
      "maxGradeDown": 0
    }
  }
}
Address picker
This intent allows to trigger a reverse gecoding and pick a location from the result list. The result will be returned to the calling activity. (In a reverse geocoding all addresses nearby a given coordinate are calculated.)
To create a new reverse geocoding Intent with the LBintents library following lines of code can be used:
// Create the launcher instance that can be used for intent creation and response processing
ActivityResultLauncher<Intent> searchIntentLauncher =
registerForActivityResult(
    new ActivityResultContracts.StartActivityForResult(),
        result -> {
            if (result != null && result.getResultCode() == Activity.RESULT_OK) {
                 String resultMessage = result.getData().getStringExtra("result");
            }
        });
// Create and launch the intent
LBReverseGeocodingIntentBuilder builder = new LBReverseGeocodingIntentBuilder(new Intent());
builder.setLatitude(latitude);
builder.setLongitude(longitude);
Intent intent = builder.build();
searchIntentLauncher.launch(intent);
Following builder-methods can be used to customize the intent:
| Method | Value | Default if unset | Example |
|---|---|---|---|
| setRadius(int radius) | The maximal distance to the search coordinate in meters | 50 | 100 |
| setMaxResults(int maxResults) | The maximal result count to pick from | 100 | 200 |
| setLatitude(double latitude) | The latitude as WGS 84 decimal coordinate to search for | The latitude of the current position | 51.556362 |
| setLongitude(double longitude) | The longitude as WGS 84 decimal coordinate to search for | The longitude of the current position | 7.208490 |
| setResponsibilityDialog(boolean showDialog) | The flag that indicates if the dialog with the legal information should be shown on app start | true | false |
The response can be processed as normal in the onActivityResult(int requestCode, int resultCode, Intent data) of your Activity, that started the Intent. The selected location is stored as Json-String in the bundle and can be accessed via its key result. The json is formatted as following:
Key: id
Type: String
Description: Unique id of the location. The returned id is not permanent and can change any time.

Key: address
Type: Object
Description: A response address which consists of address components

    Key: language
    Type: String
    Description: The ISO 639-2/1 language code.

    Key: components
    Type: Array of Objects
    Description: The address components of the found location

        Child: Object
        Key: shortName
        Type: string
        Description: The short name of this address component
        Key: longName
        Type: string
        Description: The optional long name of this address component
        Key: types
        Type: Array of Strings
        Description: The address component identifier. Possible values are: country, county, city, district, street, houseNumber, postalCode

Key: displayCoordinate
Array of number <double> (displayCoordinateWithDescription) 2 items
Description: The WGS84 decimal coordinate as longitude, latitude

Key: types
Type: Array of Strings
Description: Contains the type of the found location. Possible values are: street_address, route, postal_code or political.
Response Example
{
  "id": 976286926,
  "address": {
    "language": "de",
    "components": [
      {
        "shortName": "D",
        "types": [
          "country"
        ]
      },
      {
        "shortName": "Dortmund",
        "types": [
          "city"
        ]
      },
      {
        "shortName": "Lessingstr.",
        "types": [
          "street"
        ]
      },
      {
        "shortName": "Mitte",
        "types": [
          "district"
        ]
      },
      {
        "shortName": "44147",
        "types": [
          "postalCode"
        ]
      },
      {
        "shortName": "57",
        "types": [
          "houseNumber"
        ]
      }
    ]
  },
  "displayCoordinate": [
    "latitude",
    "longitude"
  ],
  "navigationCoordinate": [
    "latitude",
    "longitude"
  ],
  "types": [
    "street_address"
  ]
}
Screenshots:
| ReverseGeocodingResults | ReverseGeocodingPreview |
|---|---|
 |
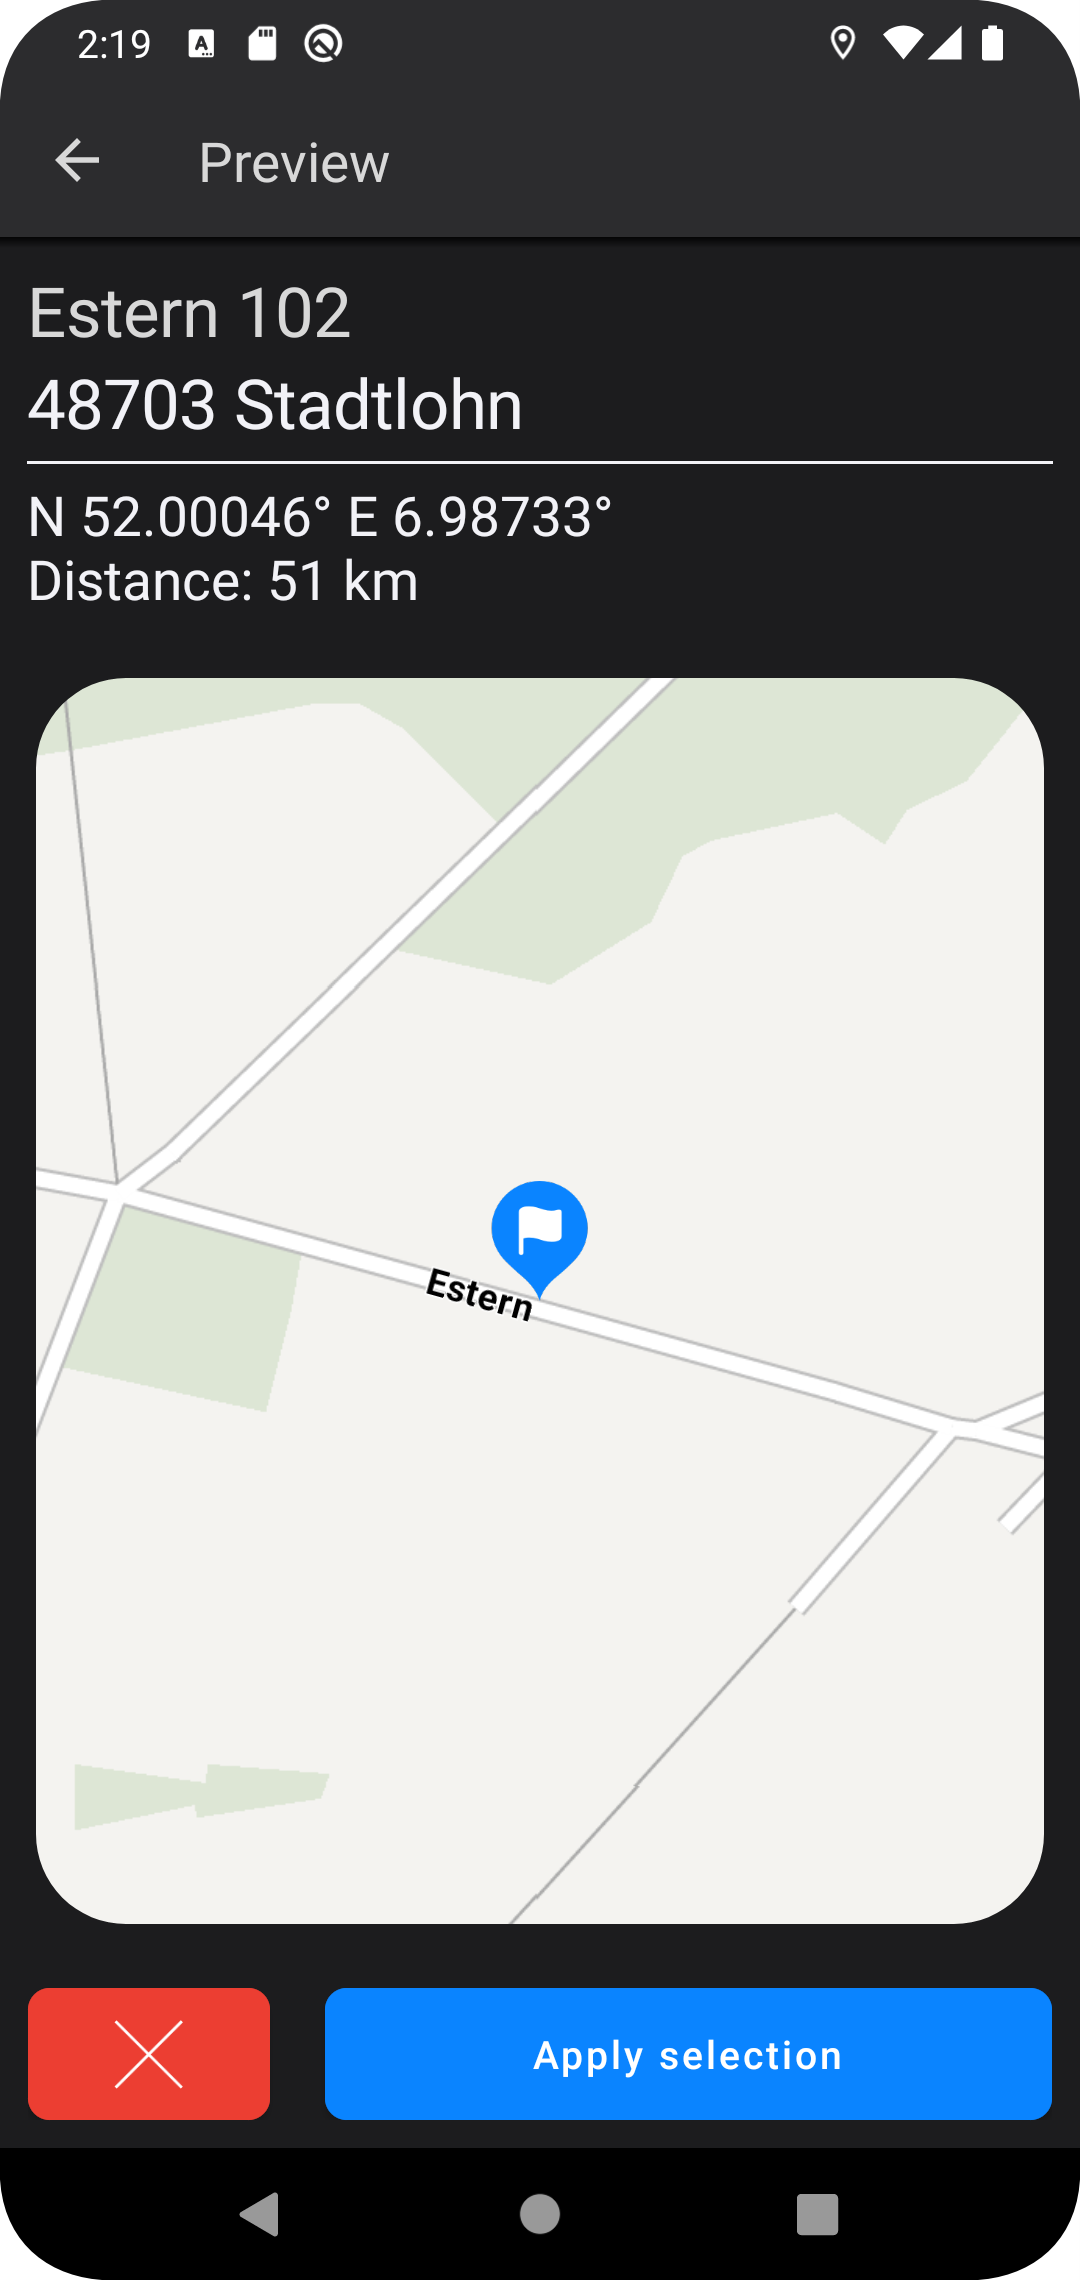 |
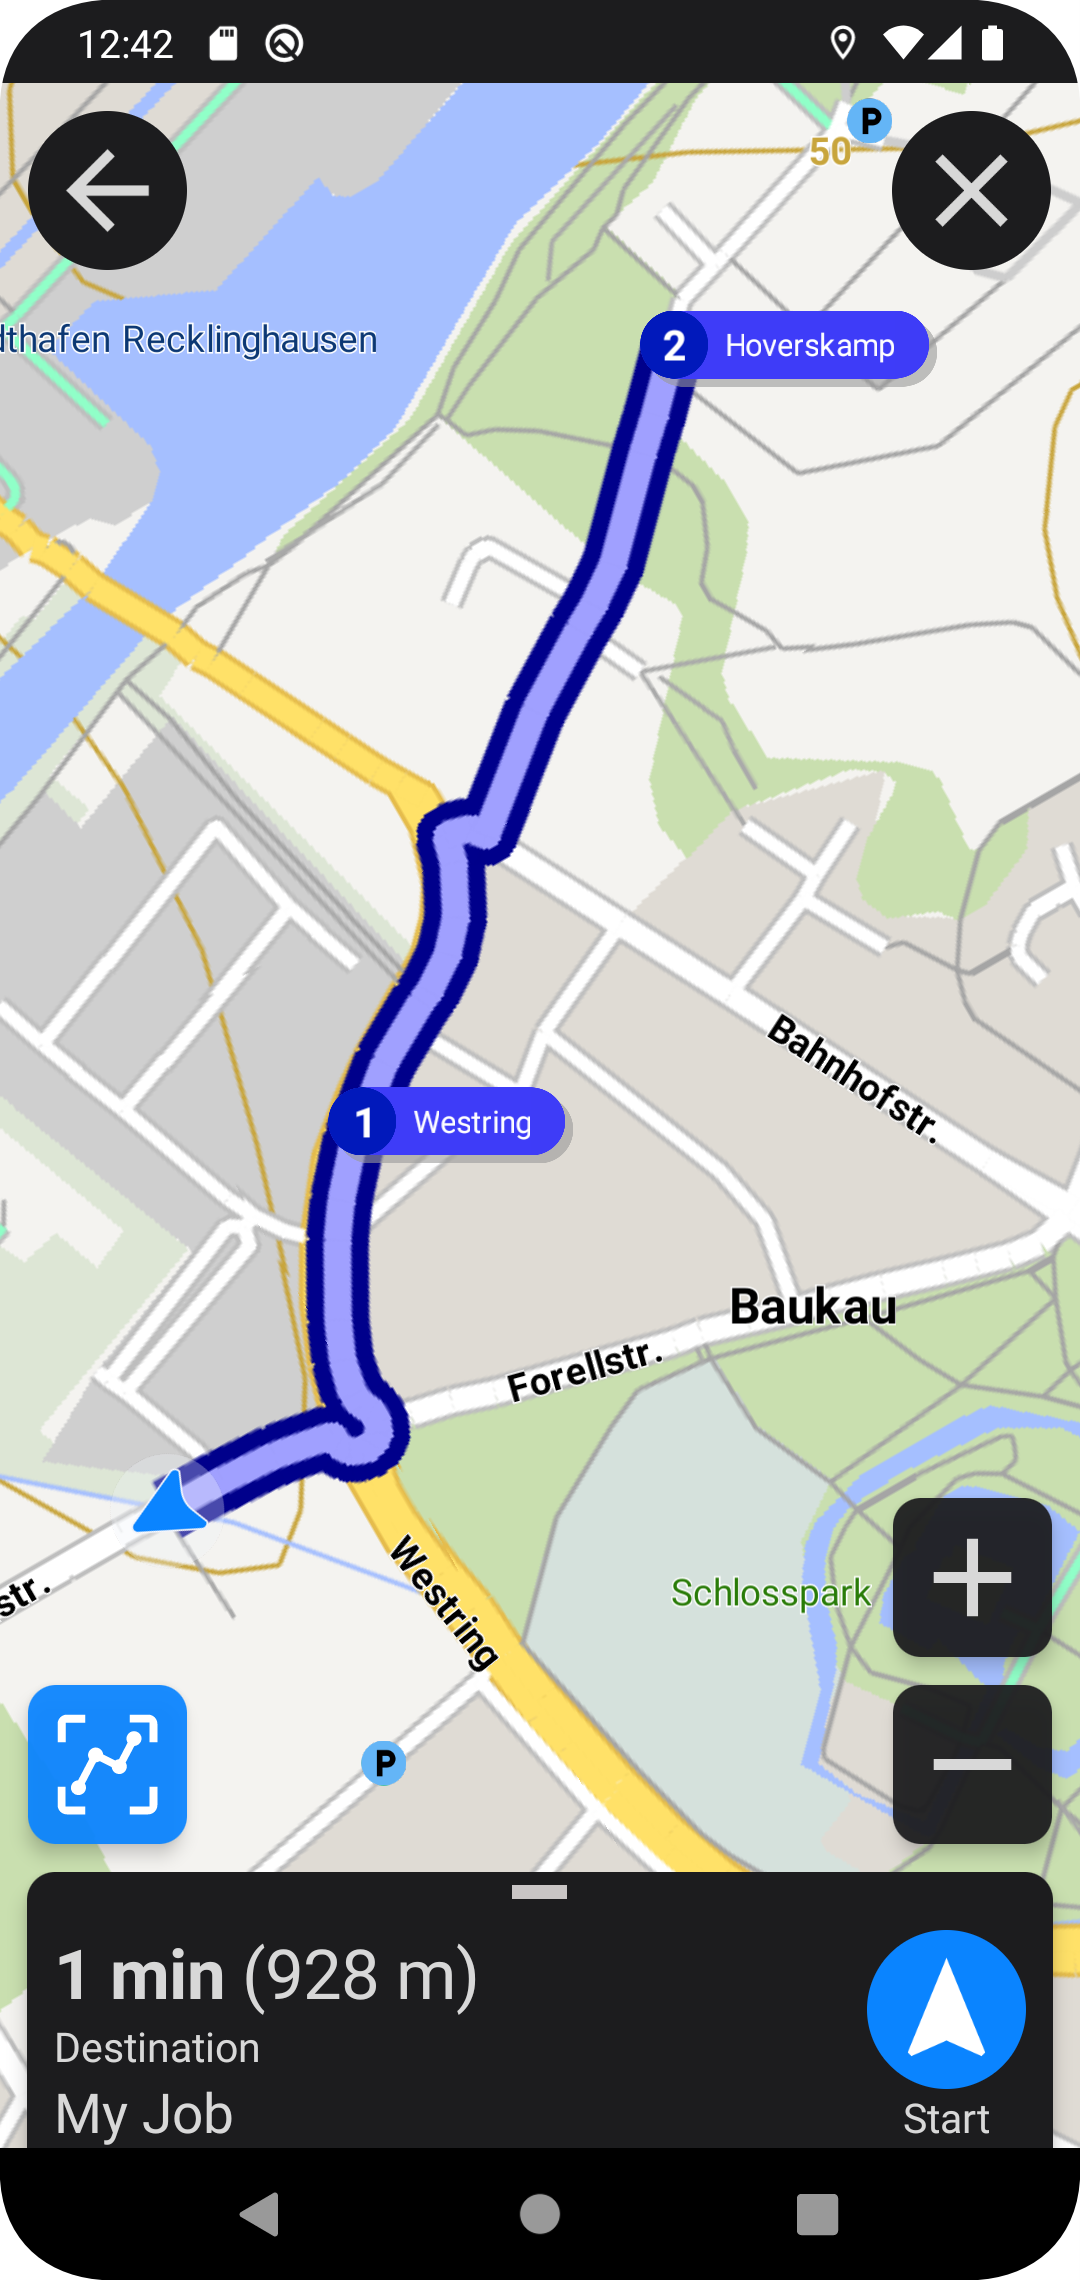
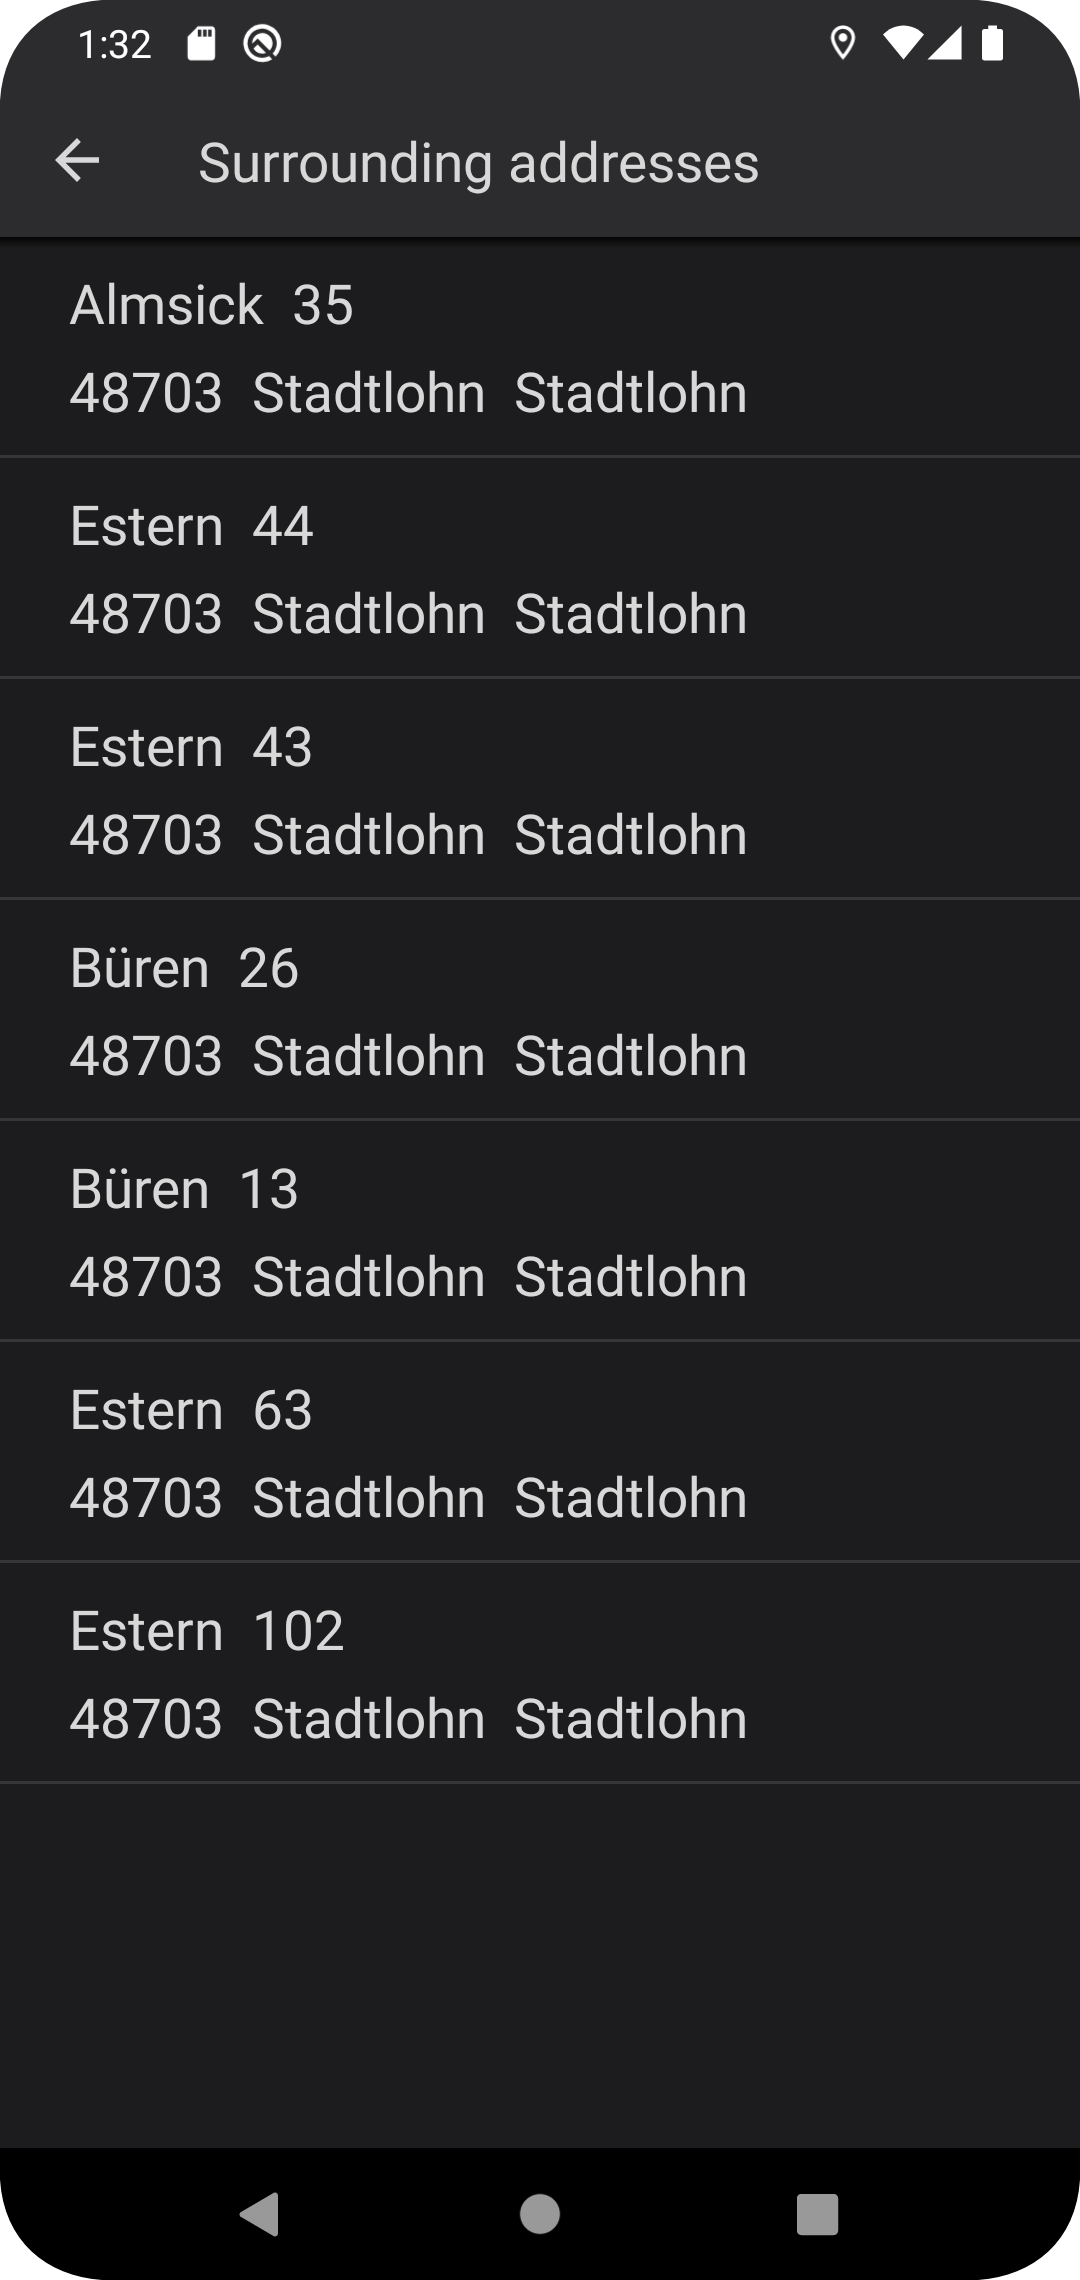
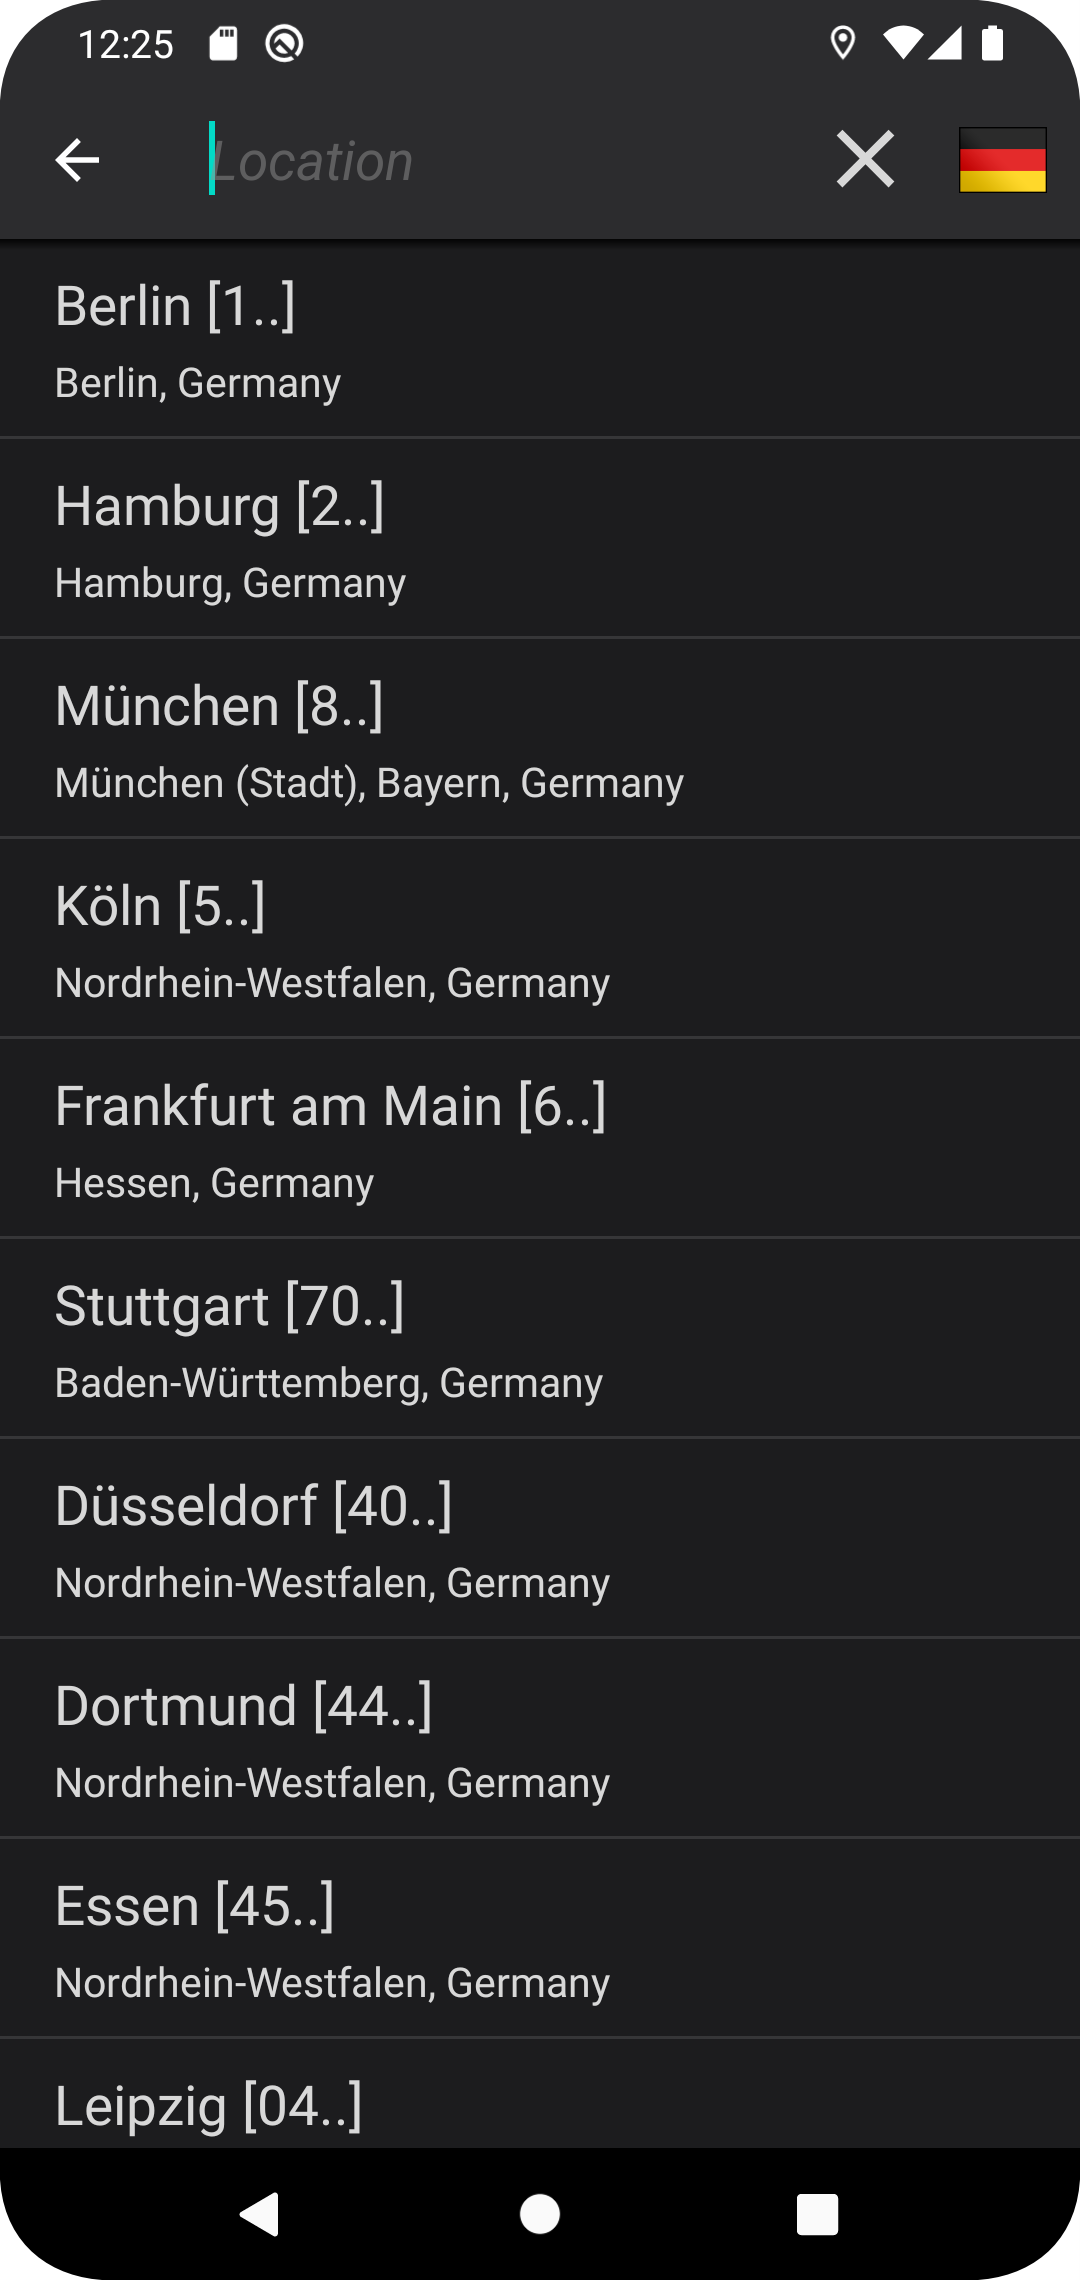
Iterative Address Search Intent
This intent allows to execute an iterative address search and pick a result. The result will be returned to the calling activity. To create a new Iterative Address Search Intent following lines of code can be used:
// Create the launcher instance that can be used for intent creation and response processing
ActivityResultLauncher<Intent> searchIntentLauncher =
registerForActivityResult(
    new ActivityResultContracts.StartActivityForResult(),
        result -> {
            if (result != null && result.getResultCode() == Activity.RESULT_OK) {
                 String resultMessage = result.getData().getStringExtra("result");
            }
        });
// Create and launch the intent
LBIterativeSearchIntentBuilder builder = new LBIterativeSearchIntentBuilder(new Intent());
builder.setResponsibilityDialog(responsibilityDialog); // optional
builder.setLoginCredentials(userName, password); // optional
Intent intent = builder.build();
searchIntentLauncher.launch(intent);
The response can be processed as normal in the onActivityResult(int requestCode, int resultCode, Intent data) of your Activity, that started the Intent. The selected location is stored as Json-String in the bundle and can be accessed via its key result.
The json is formatted as following:
Key: id
Type: String
Description: Unique id of the location. The returned id is not permanent and can change any time.

Key: address
Type: Object
Description: A response address which consists of address components

    Key: language
    Type: String
    Description: The ISO 639-2/1 language code.

    Key: components
    Type: Array of Objects
    Description: The address components of the found location

        Child: Object
        Key: shortName
        Type: string
        Description: The short name of this address component
        Key: longName
        Type: string
        Description: The optional long name of this address component
        Key: types
        Type: Array of Strings
        Description: The address component identifier. Possible values are: country, county, city, district, street, houseNumber, postalCode

Key: displayCoordinate
Array of number <double> (displayCoordinateWithDescription) 2 items
Description: The WGS84 decimal coordinate as longitude, latitude

Key: types
Type: Array of Strings
Description: Contains the type of the found location. Possible values are: street_address, route, postal_code or political.
Response Example
{
  "id": 976286926,
  "address": {
    "language": "de",
    "components": [
      {
        "shortName": "D",
        "types": [
          "country"
        ]
      },
      {
        "shortName": "Dortmund",
        "types": [
          "city"
        ]
      },
      {
        "shortName": "Lessingstr.",
        "types": [
          "street"
        ]
      },
      {
        "shortName": "Mitte",
        "types": [
          "district"
        ]
      },
      {
        "shortName": "44147",
        "types": [
          "postalCode"
        ]
      },
      {
        "shortName": "57",
        "types": [
          "houseNumber"
        ]
      }
    ]
  },
  "displayCoordinate": [
    "latitude",
    "longitude"
  ],
  "navigationCoordinate": [
    "latitude",
    "longitude"
  ],
  "types": [
    "street_address"
  ]
}
Screenshots:
| IterativeSearch | ReverseGeocodingPreview |
|---|---|
 |
|
Rotate map
Since Version 2.2.1 of the navigator it is possible to rotate the map using Intents. The new rotation of the map is chosen through the already defined rotations in the navigator and any user created rotations as described under Define additional map rotations. The following example shows how to create and send the rotate map intent:
RotateMapIntentBuilder intentBuilder = new RotateMapIntentBuilder(new Intent());
Intent intent = intentBuilder.setMapRotation("Direction of travel")
        .build();
startActivity(intent);
The following options exist in the navigator by default for setMapRotation:
| Rotation title | Rotation |
|---|---|
| North | Map is north aligned |
| Direction of travel | Map rotation follows the vehicles compass direction |
| 3d | Map rotation follows the vehicles compass direction and puts the map into 3d mode |
In addition to these rotation titles the available titles are those defined for rotations as described under Define additional map rotations.
Login
Since Version 1.5 of the Navigator it is possible to login a user using Intents. Any existing Intent described in this document, as well as the main Intent, may be used to login an user. To do that it is just necessary to call the setLoginCredentials with the credentials on any intent builder. The following shows an example of such a call when creating a roadblock:
RoadblockIntentBuilder builder = new RoadblockIntentBuilder(new Intent());
builder.addRoadblock(new RoadblockDescription());
builder.setLoginCredentials("username", "password");
Intent intent = builder.build();
startActivity(intent);
Username and password should be set as plain text and are therefore not encrypted.
The Navigator interprets these extras in any intent handled by it, which includes the "Main"-Intent that is normally used to start the Navigator. The intent which includes the users credentials will be executed after the login was successfully completed.
Because of the necessary process to login, users of these extra should note, that the user may not end up in the same screen after the intent was executed, as he was in before the intent was executed. Intents which normally do not change the current screen, will show the map, if combined with the login extras.